ESG commitments are a growing trend for oil and gas producers.
To help producers meet these goals, Kimray has been focusing on creating solutions that reduce or eliminate emissions. One of these products is the Low Pressure High Volume Valve, or LPHV, installed with an electric actuator.
In this video, I’ll show you how to convert a pneumatic LPHV to electric.
What is the Low Pressure High Volume Valve?
The LPHV is a durable solution with trim designed specifically for erosive conditions in today's oilfield.
Since its release in 2021, the LPHV has proven to be very effective, with producers reporting the trim lasting as much as 10x longer than other trim in extremely erosive conditions.
- Field Study: How the LPHV Improved Uptime on 3-Phase Separators in the Bakken
- How the LPHV Limits Valve Damage
Can I Use Electric Actuator on the Low Pressure High Volume Valve?
The LPHV is the first Kimray low pressure dump valve that can be electrically actuated, allowing producers to now experience the benefits of emissions-free operation.
You can convert an existing pneumatic LPHV without having to remove the valve from the line, or you can purchase a pre-programmed and calibrated LPHV with electric actuation from your local Kimray store or distributor.
Kimray offers two types of electric actuator:
In the video I show you how to convert the LPHV to use each of these electric actuators. Step-by-step instructions are below.
For these conversion demonstrations we will be using a 2” LPHV, but the same actuators shown here are used for all sizes, with different mounts based on the valve size.
how to install the LPHV with a rotary electric actuator
We’ll start with the Valvcon rotary actuator. Below is a list of the component and tools you need to convert from a standard pneumatic LPHV.
Components Needed:
- LPHV Body
- Valvcon
- R2L
Tools Needed for 2” LPHV (with YHN)
- 1/2" socket for R2L mounting to valve
- 1/4" socket for coupling block
- 10mm or adjustable for Valvcon mounting screws
Tools needed for 3” and 4” LPHV (with YHO)
- 5/8” socket for R2L mounting to the valve
- 7/16” socket for coupling block
- Adjustable wrench for Valvcon mounting screws

DISASSEMBLY
- Use a 1/4” socket to loosen the bolts on the coupling block and remove.
- Use a 5/8” socket to remove the four mounting bolts from the valve body.
- Then remove the pneumatic actuator.
ASSEMBLY
- Place the R2L on top of the valve body, oriented so the operator will be able to see the travel indicator.
- Hand-start the included mounting bolts and tighten in a star pattern with a 1/2” socket to 25-30 ft/lbs torque.
- Remove the coupling block by unthreading the two bolts with a ¼" socket.
- Turn the rotary shaft so that it touches the valve shaft.
- Then, position the two coupling block pieces and travel indicator as shown and hand-start the two bolts.
- Tighten with a 1/4" socket gradually, going back and forth between the two bolts so that the coupling block compresses evenly.
- Out of the box, the travel indicator scale will be loose. This can be positioned into place later during the Valvcon calibration.
- Now you can mount the Valvcon to the R2L using the included bolts. The face of the Valvcon should be facing the same way as the R2L tag.
- Start the four included mounting bolts by hand and tighten with a 10mm or adjustable wrench.
This completes the assembly. For wiring and calibration instructions, watch How to Calibrate the Valvcon Electric Actuator.
how to install the LPHV with a linear electric actuator
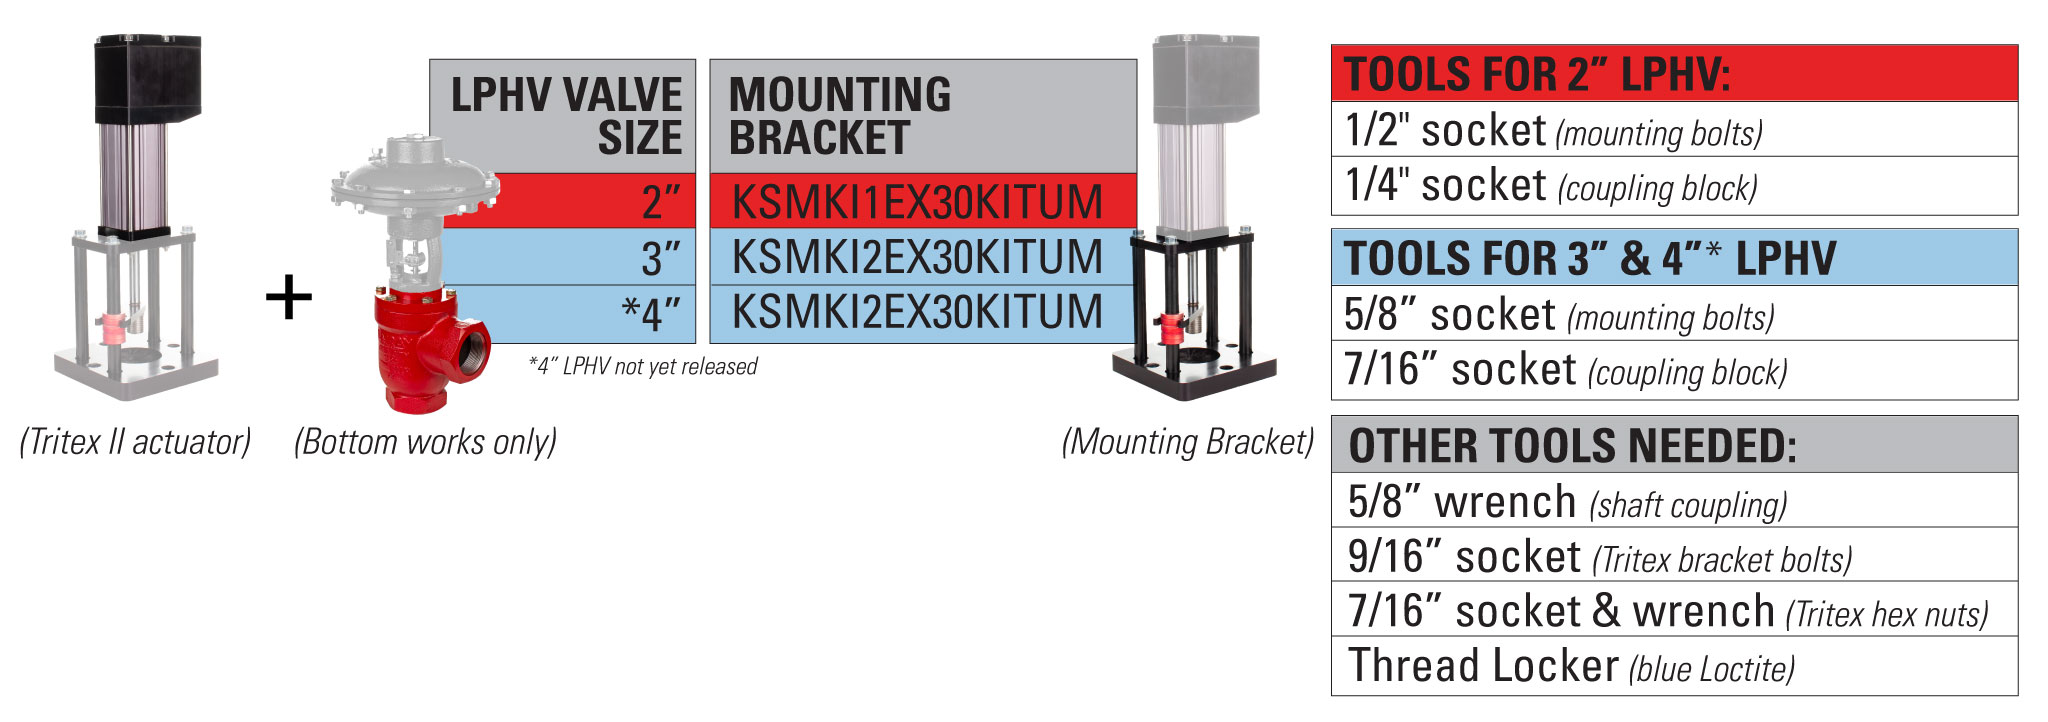
Below are the components and tools you will need to convert to the Tritex linear electric actuator.
Components Needed
- LPHV Body
- Tritex
- Mount
Tools Needed for 2” LPHV
- 1/2" socket (mounting bolts)
- 1/4” socket (coupling block)
Tools Needed for 3” & 4" LPHV
- 5/8” socket (mounting bolts)
- 7/16" socket (coupling block)
Other Tools Needed:
- 5/8” wrench (shaft coupling)
- 9/16” socket (Tritex bracket bolts)
- 7/16” socket & wrench (for Tritex hex nuts)
- Thread Locker (blue Loctite)
DISASSEMBLY
- Use a 1/4” socket to loosen the bolts on the coupling block and remove.
- Use a 5/8” socket to remove the four mounting bolts from the valve body.
- Then remove the pneumatic actuator.
Assembly
- Place the bottom plate of the mounting bracket on top of the valve, oriented to your preference, either parallel or perpendicular.
- Install the included bolts with lock washers and tighten with a 5/8” socket in a star pattern.
- Next, apply Loctite to four of the included flanged bolts, and use them to attach the four standoffs to the bottom plate. Then tighten with a 9/16” socket.
- Slide the bushing onto one of the four standoffs, and slide the anti-rotate bracket into the bushing. It will fit in a couple of orientations, but either will work.
- Place the top plate onto the standoffs.
- Apply Loctite to the remaining four flanged bolts and hand start into the standoffs.
- Tighten with a 9/16” socket. Now you’re ready to install the Tritex actuator.
- Remove the four nuts and washers from the bottom of the Tritex.
- Apply Loctite to the threaded end of the Tritex Shaft, and thread on the Shaft Coupling.
- Place the Tritex onto the top plate. The orientation is not critical but it's best to orient so that the wiring terminals are easy to access.
- On each of the four rods, slide on a washer, and thread a nut onto each.
- Hold the top nuts in place with a 7/16” socket, and use a 7/16” wrench to tighten the bottom nuts in a star pattern to 7.5 ft-lbs.
- The last step is to join the Tritex shaft to the valve shaft with the coupling block. You will likely need to move the Tritex shaft up or down into position, so this step will be done after the wiring is connected and the actuator is powered on.
- When you are ready to attach it, place the two coupling block halves together around the shafts and thread the two bolts in.
- Tighten with a 7/16" socket gradually, going back and forth between the two bolts so that the coupling bock compresses evenly.
- For wiring and calibration instructions, watch How to Calibrate the Tritex II Electric Actuator.
Now you are ready for emissions-free control!
For questions about the LPHV with electric actuation, or to place an order, contact your local Kimray store or authorized distributor.