In this article and video, we show how to repair and rebuild a 2" Stem Guided High Pressure Control Valve, as well as how to easily change or convert the actuator fail position from fail open to fail close.
This Kimray control valve disassembly and assembly uses a Kimray repair kit.
Before beginning, consult your company's safety guidelines and requirements. Follow all regulations and wear all necessary PPE.
Tools Needed
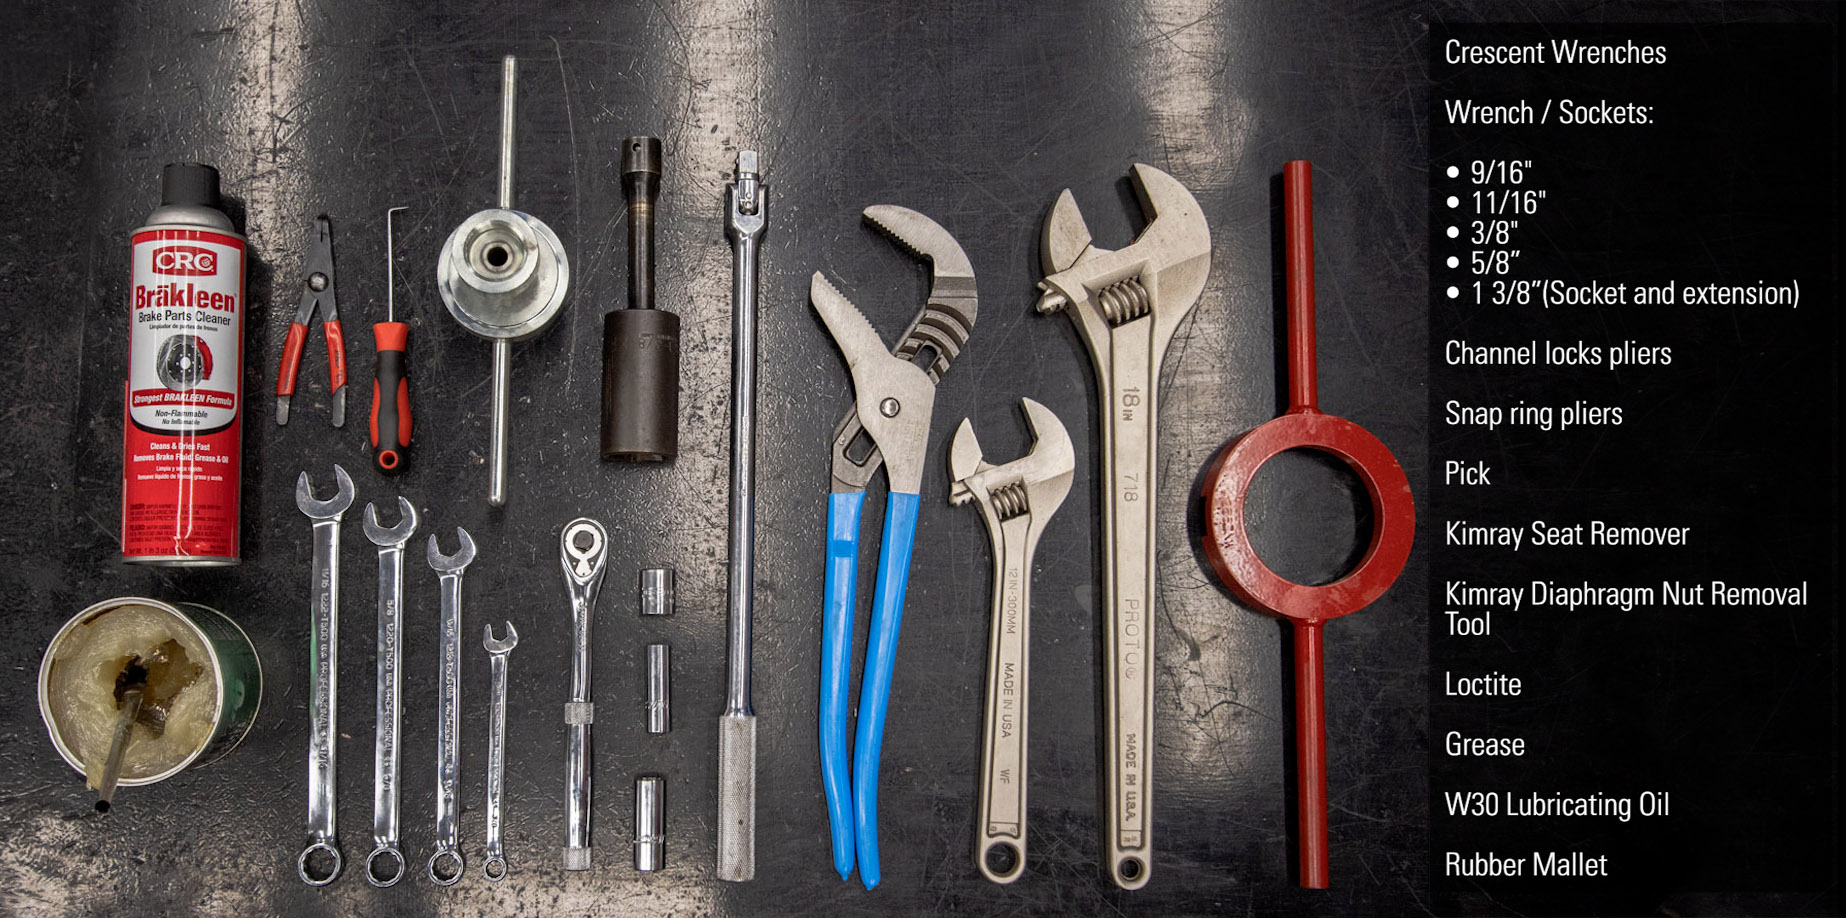
- Crescent Wrenches (various sizes)
- Wrench / Sockets
- 9/16"
- 11/16"
- 3/8"
- 5/8"
- 1 3/8" (Socket and Extension)
- Channel Locks Pliers
- Snap Ring Pliers
- Pick
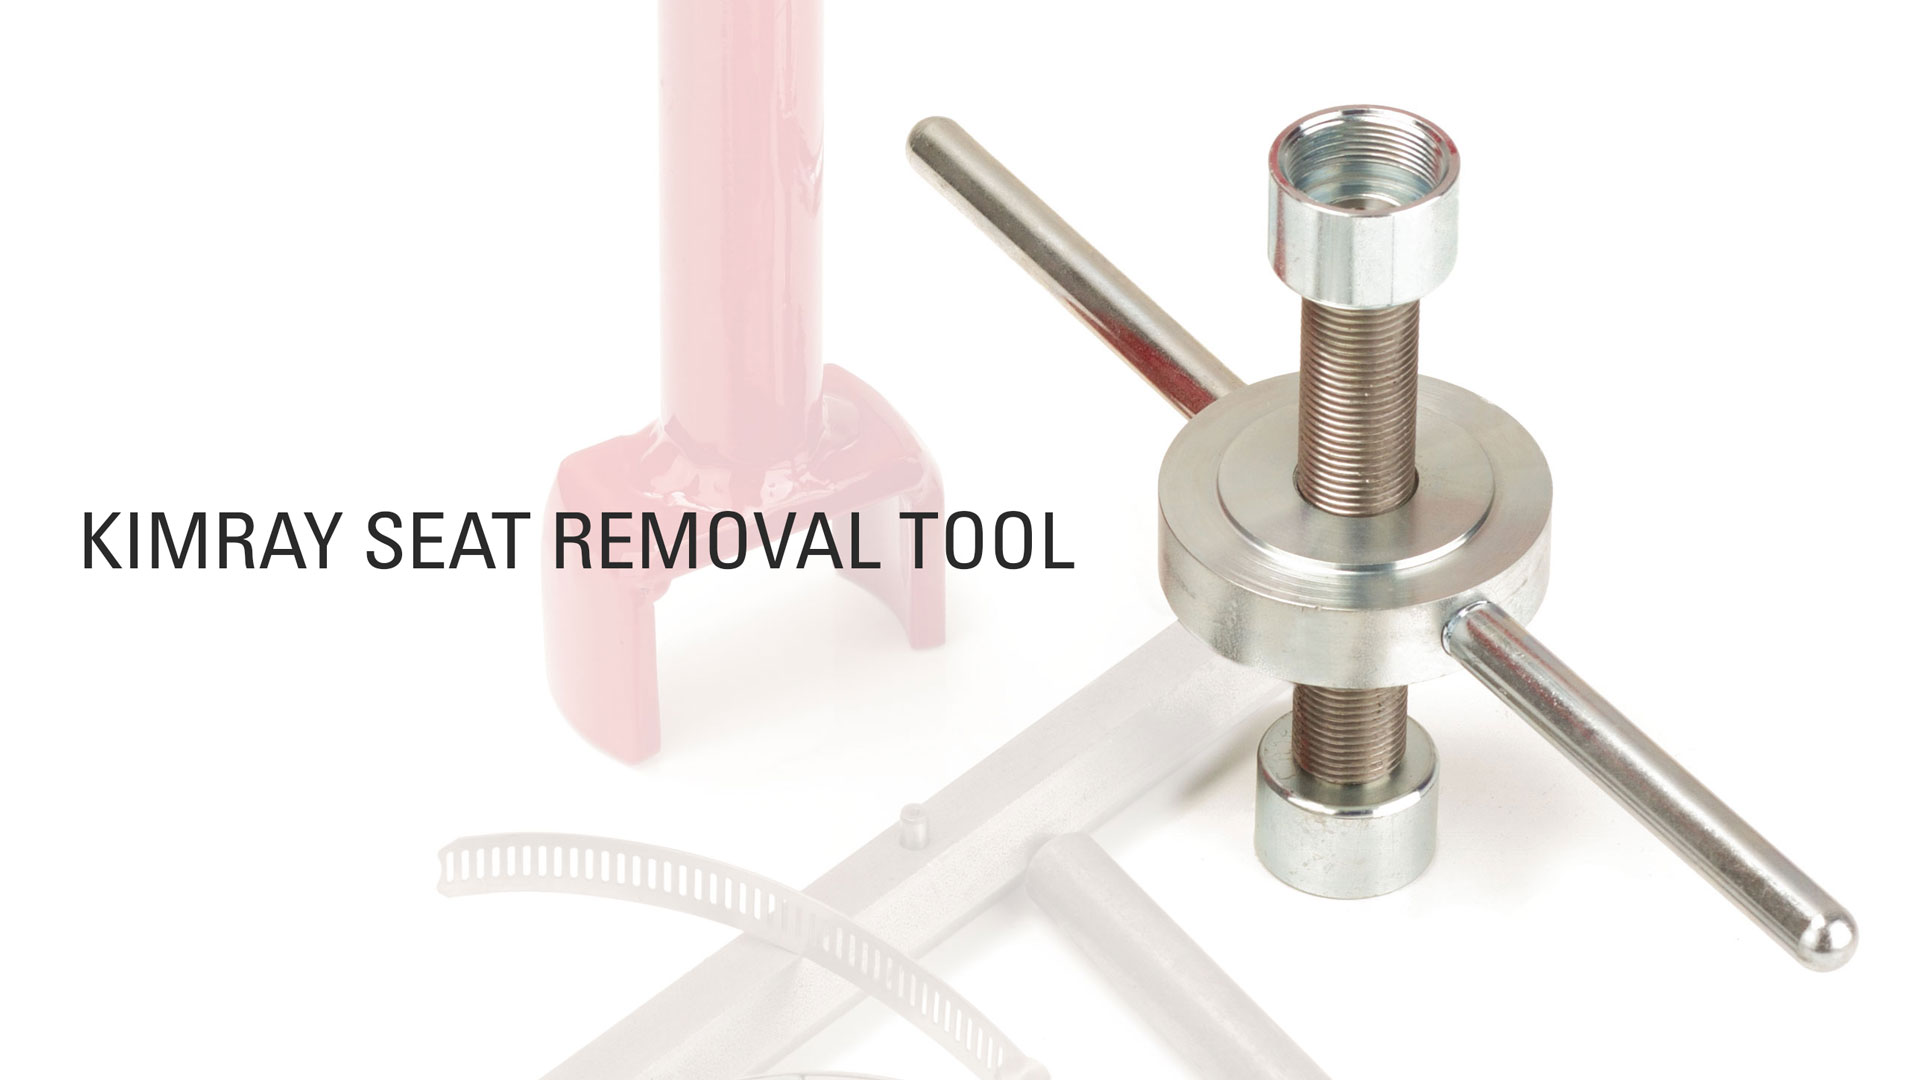
- Kimray Seat Remover
- Kimray Diaphragm Nut Removal Tool
- Loctite
- Grease
- W30 Lubricating Oil
- Rubber Mallet
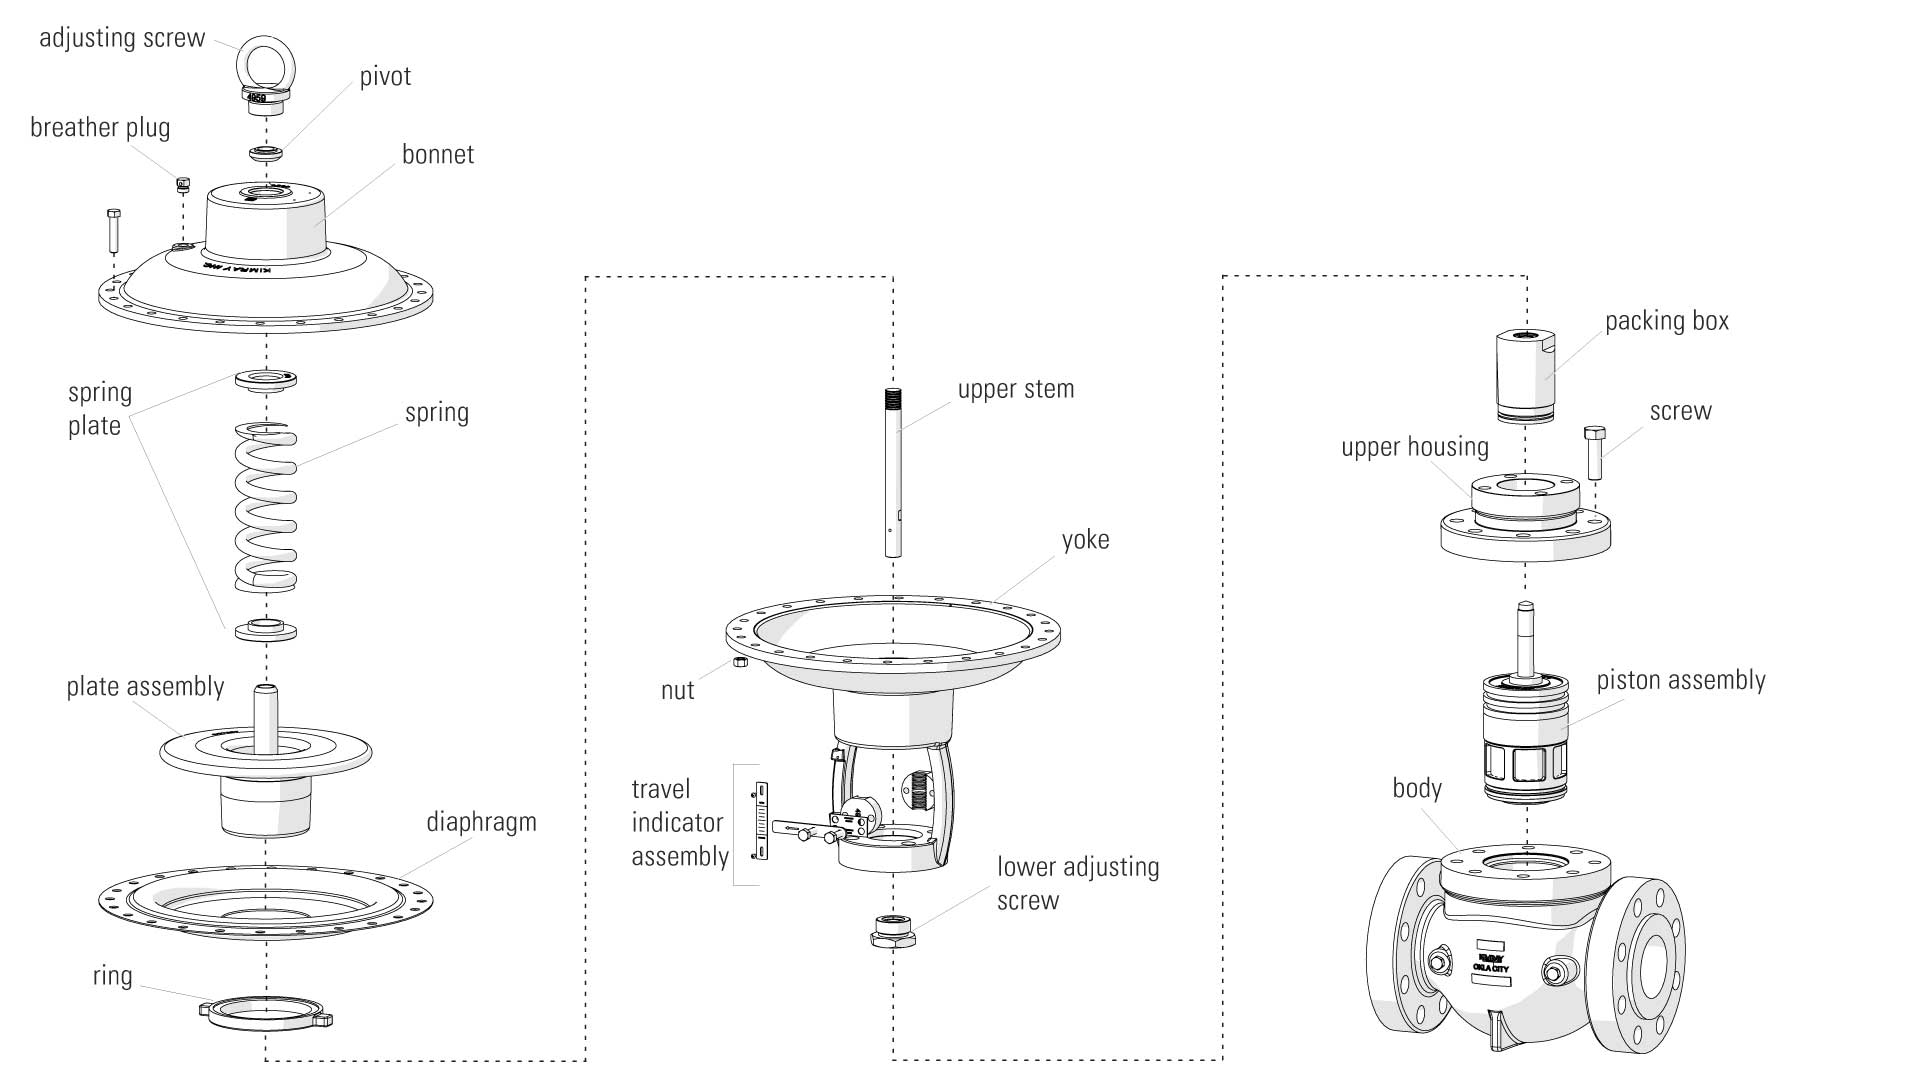
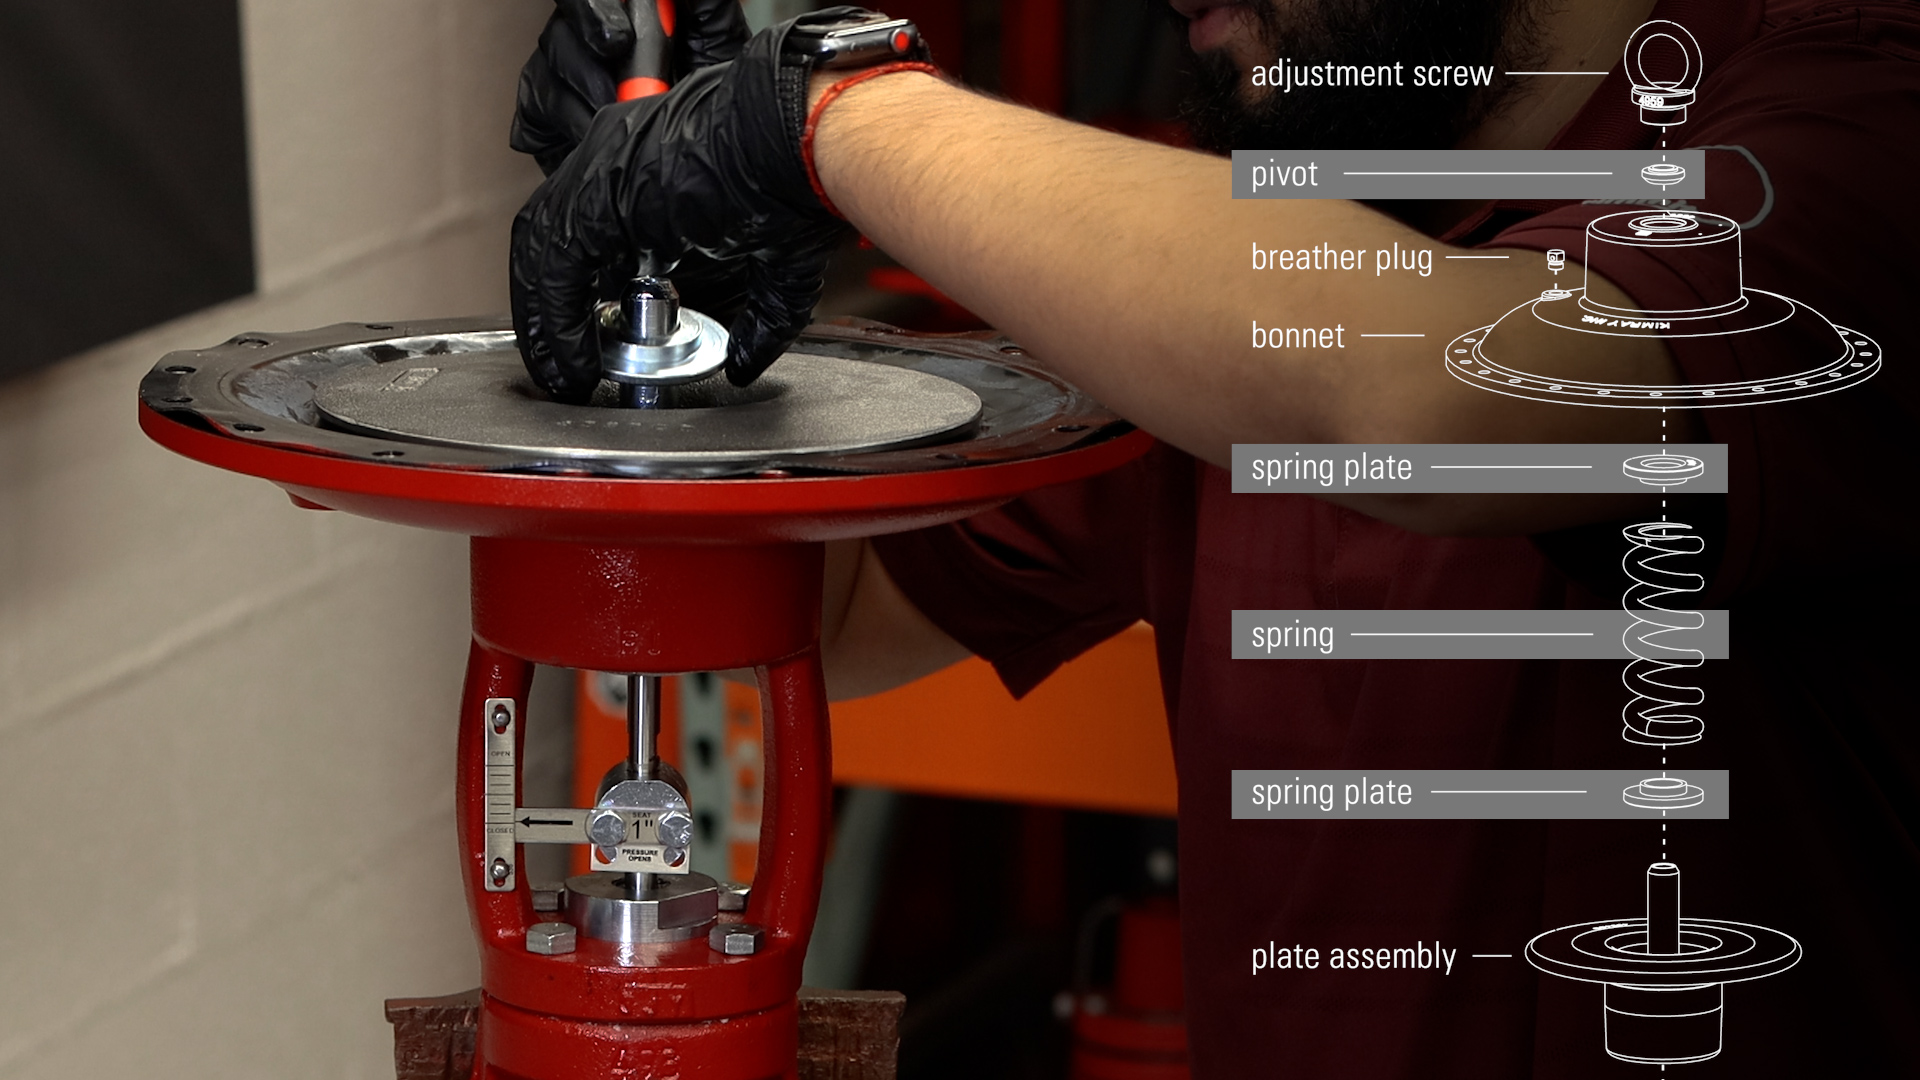
How to Disassemble a Stem Guided High Pressure Control Valve
- Start by removing the upper adjustment screw. The pivot may also come off with the adjustment screw. If it does not, we will take it out later.
- Next, remove the breather plug and upper bonnet bolts.
- Remove and discard the O-ring from your upper adjustment screw.
- Remove the bonnet, pivot, upper spring plate, spring, and lower spring plate.
- Next, unthread the diaphragm plate from the upper stem.
- There are two flats on the upper stem to put a 3/8" wrench to stabilize it while you unthread the diaphragm plate.
- Now remove your diaphragm and diaphragm plate.
- Use a 7/16" wrench to loosen your coupling block bolts and remove your coupling block.
- Next, remove the four bolts from your yoke base and empty all the oil out of your yoke.
- Remove the upper stem, you may need a mallet for this.
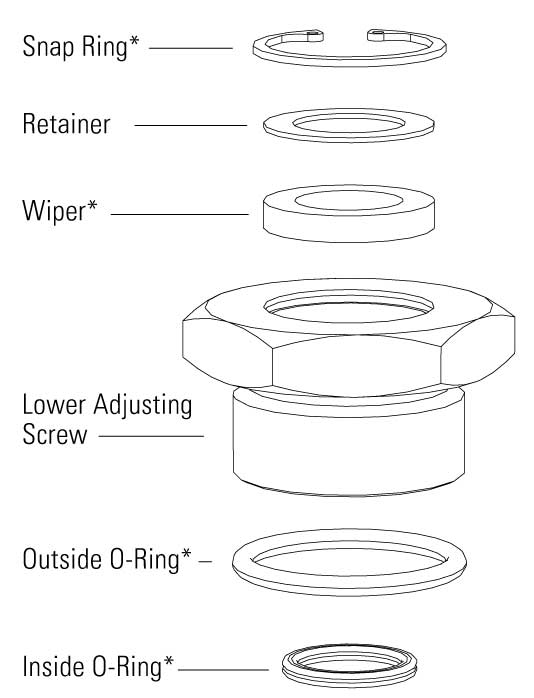
- Flip the yoke over and remove the lower adjustment screw with a 1 3/8" socket and extension.
- On the lower adjustment screw, remove and discard the snap ring. Then remove and keep the retainer. Discard the wiper, outside O-ring and inside O-ring.
- Use a large wrench on the two flats to remove the stuffing box assembly from the body and mount it in a vise.
If the seat separates from the cage inside the valve body, use a Kimray Seat Removal Tool. Another problem could be that the cage comes unthreaded from the stuffing box and stays in the valve body. Flip the Kimray Seat Removal Tool over, thread it onto the cage and remove it all in one piece.
- Insert a screwdriver through the cage to hold it still while you remove the seat with a wrench.
- Then use the screwdriver to loosen the cage by a few rotations while keeping the threads engaged. This will remove tension from the stem so you can pull it out. You may need to use a mallet.
- Now you can take the cage off completely.
- Next, remove the spring, follower, and packing from the stuffing box as well as the O-ring on the outside.
- Remove and discard the O-ring from the seat.
- Turn the stuffing box over and use a pair of snap ring pliers to remove the snap ring.
- Remove and save the retainer but discard the felt wiper.

The diaphragm needs to be inspected for any abnormal wear like punctures or swelling. If it is damaged, you will need to order a replacement because it is not included in the repair kit. It’s also good to inspect the part of the diaphragm under the diaphragm nut. However, to remove this or to replace the diaphragm, you will need the Kimray Diaphragm Nut Removal Tool.
- Put the Kimray Diaphragm Nut Removal Tool on the diaphragm nut and put the diaphragm plate into the vise.
- Now you can inspect the diaphragm fully and remove and replace it if needed.
At this point, you're ready to reassemble the valve.
How to Reassemble a Stem Guided High Pressure Control Valve
- Start with the stuffing box assembly. Install the felt wiper, retainer, and snap ring.
- Then put the O-ring on the outside.
- Slide the packing rings on the packing sleeve.
- Coat the inside of the stuffing box with grease and push the packing sleeve into the assembly.
- Next, put in your follower and the spring, then mount the assembly in a vise.
- Push down on the cage and use a screwdriver to engage the threads. Do not tighten the cage completely. This will allow you to install the trim through the stuffing box assembly later.
- Insert the stem into the assembly and use a mallet to tap the lower stem as far down as possible so it will meet the upper stem during assembly.
- Put the O-ring on the seat and tighten it onto the cage with a crescent wrench.
- Now put the valve body into the vise.
- Grease both O-rings on the stuffing box assembly and tighten the stuffing box into the valve body.
- To assemble the topworks, start by putting together the lower adjustment screw.
- Insert the felt wiper followed by the retainer and snap ring.
- Then attach the outer O-ring and inner O-ring.
- Grease the lower adjustment screw O-ring and install it into the yoke.
- Put the pivot stem into the vise. Be careful not to damage it.
- Grease the diaphragm plate and install the diaphragm.
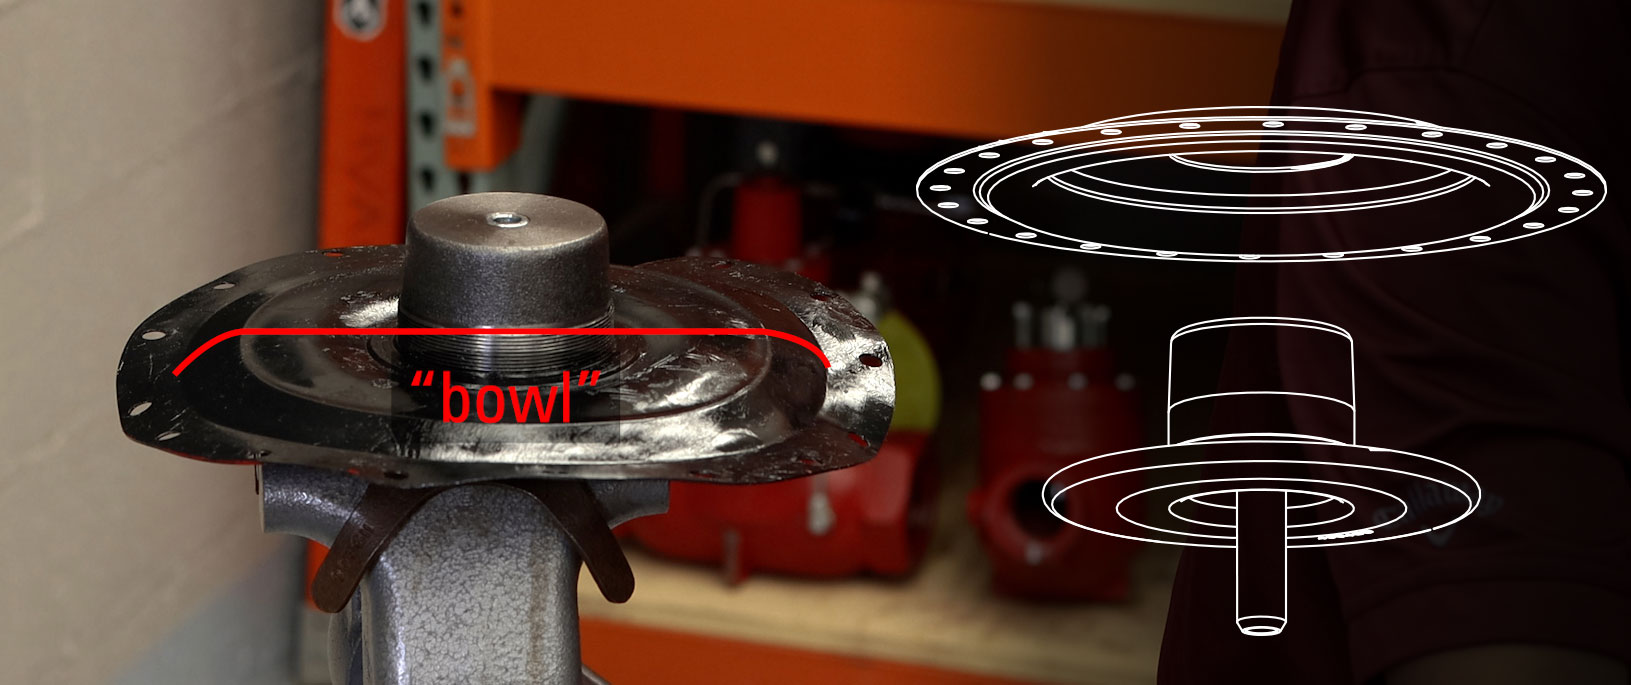
- The "bowl" of the top works diaphragm should always face the diaphragm plate for both fail open and fail close positions.
control valve diaphragm bowl shape
- Grease the diaphragm and attach the diaphragm nut.
- Use the custom Kimray tool to tighten it fully. Do not overtighten it because it will cause the diaphragm to bulge.
- Now put the valve body back in the vise.

How to Assemble for Fail Close Position
- Grease the inner O-ring in the lower adjustment screw and then insert the upper stem.
- Add oil inside the yoke.
- Apply Loctite to the threads on the upper stem
- Attach the diaphragm assembly. Use a 3/8" wrench on the flats to keep it from rotating.
- Grease the bottom of the pivot sleeve.
- Install the lower spring plate, spring, and upper spring plate.
- Then grease the top of the spring plate.
- Replace the bonnet aligning the diaphragm holes with the bolt holes.
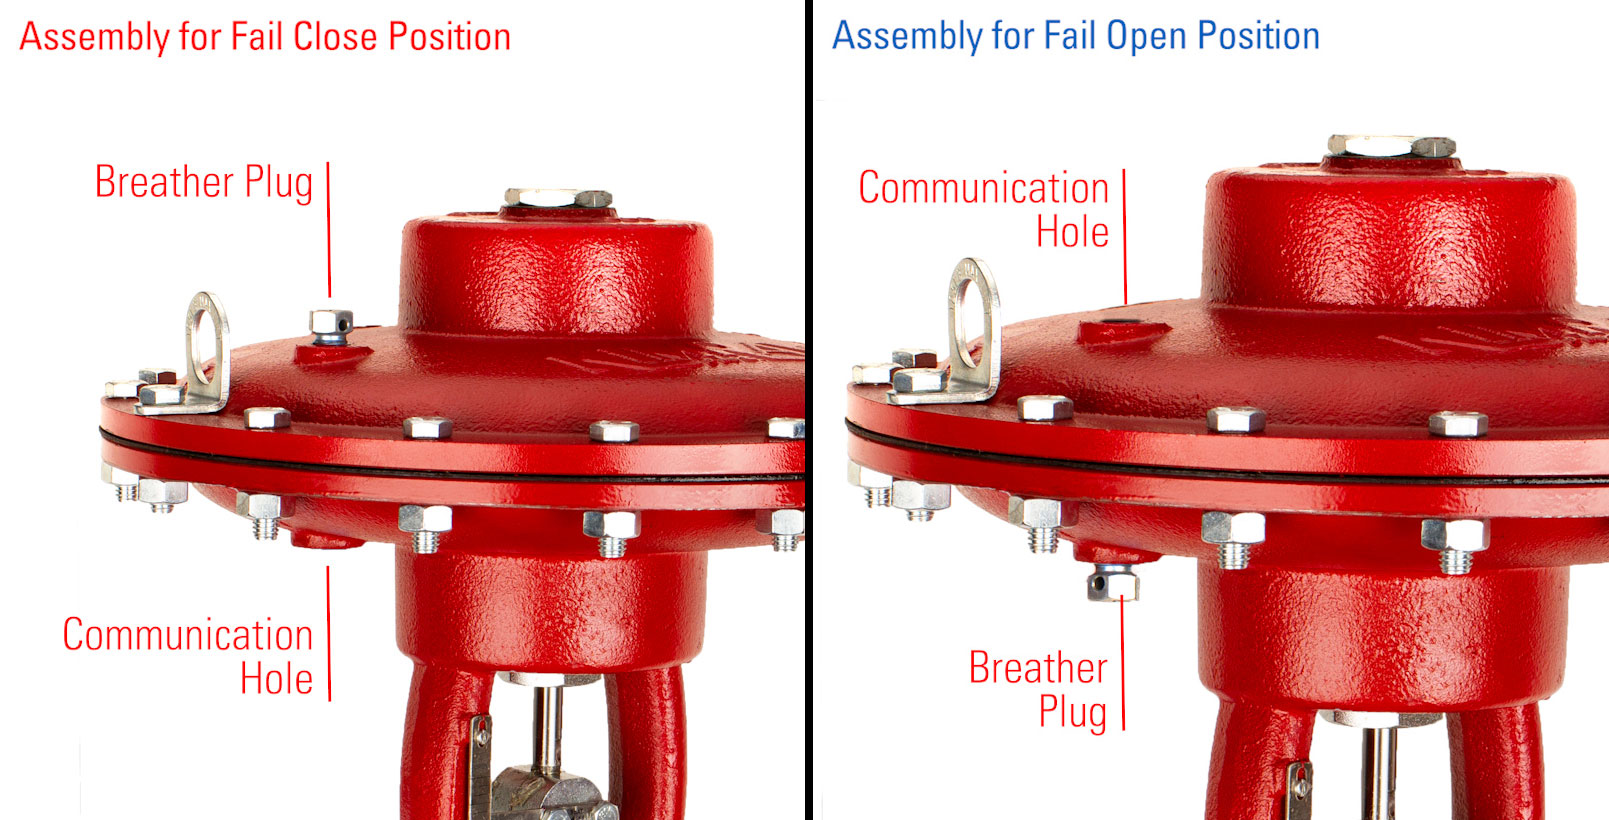
- Also align the breather plug with the communication hole.
How to Assemble for Fail Open Position
- Apply Loctite to the threads and insert the upper stem into the other side of the pivot sleeve.
- Use a 3/8" wrench to hold the stem.
- Install the pivot on the lower adjustment screw with the bevel side facing up.
- Add grease, then install the lower spring plate, spring and upper spring plate.
- Grease the upper spring plate and the upper stem to prevent damaging the O-ring in the lower adjustment screw and then install the assembly.
- Replace the bonnet aligning the diaphragm holes with the bolt holes.
- Also align the breather plug with the communication hole.
Final Assembly Steps for either fail position (shown in video as Fail Closed)
- Mount the topworks actuator on the valve body and tighten the four lower bolts.
- Tighten the bonnet bolts in a star pattern to apply pressure evenly.
- Place the O-ring on the upper adjustment screw and grease the top to hold your pivot in place.
- Then grease the O-ring and thread it into the bonnet and tighten with a wrench.
- Make sure your breather plug is clear of any debris. For fail close, install it on the top of the bonnet. For fail open, install it on the bottom.
- Attach the coupling block with the flat side on top and the rounded side on bottom.
- Change the indicator tag to match your fail position.
If you have any questions about any of this process or the custom Kimray tools used, reach out to your local Kimray store or authorized distributor.