Looking for control valve installation best practices?
Below we'll cover 7 things you must do when installing a high pressure control valve.
1. Don't Hold the Control Valve by the Tubing
Tubing often looks like the perfect handle to lift a valve. However, lifting the valve by this method can quickly bend the tubing itself or the connection point where the nut and ferrell are. And if you bend it too much it can break that seal to the valve.
The best way to pick up a control valve is either by the valve body itself, the topworks or the lifting hooks on the top.
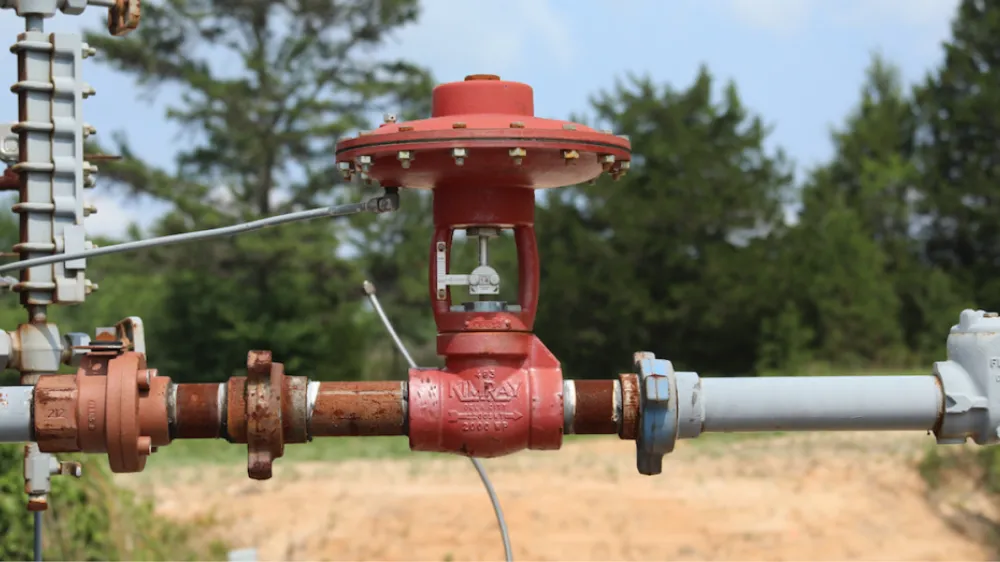
2. Install Isolation Ball Valves
The second best practice is to install ball valves on both the upstream and downstream side of the control valve.
When it's time to do maintenance on a valve, you will need completely cut off any pressure on the upstream and downstream side. This process is referred to as the double block and bleed procedure, and ball valves make it easy to do.
3. Mount the Control Valve Vertically
We often get asked if customers can mount their through-body control valve sideways.
Normally for a through-body valve, the inlet and outlet piping should be horizontal.
However, sometimes, depending on construction of the vessel, the piping the valve is to be installed on is vertical, so if you install the valve without adjusting the piping, the valve would be sideways.
We do not recommend you do this. Here's why.
If you mount the valve horizontally, the weight of the topworks internals and the valve trim pushes the valve stem onto one side of the packing. Because of this, over time you will experience premature wear on the packing and valve stem that could potentially lead to leaks in the valve.
Mounting a HPCV sideways does not allow the lubricating oil on the topworks to travel to the stem. This expedites the wear on the upper stem.
The best practice is to install the valve in vertical orientation so it looks like it's standing upright.
4. Check the Fail Position
Check and make sure the fail position of the control valve is correct for your application.
Sometimes we are asked "Control valves should always be in what position?" This is an impossible question to answer, because it depends on your application.
If you are using it for back pressure, you want it to fail open so pressure doesn't build. However, you may want it to fail closed to protect downstream equipment if there is a failure. (Learn more here: Should My Valve Fail Open or Closed?)
The easiest way to check your valve's fail position is to look at the position indicator to see if the valve is open or closed before you have any pressure on it.
- Is it open? Then the valve is set to fail open.
- Is it closed? Then the valve is set to fail closed.
The good new is if it's in the wrong fail position, you can open up the top works and convert it without having to buy extra parts.
5. Check for Clean, Dry Supply Gas
Wet or dirty gas doesn't always affect the valve itself, but it does affect the pilot or level controller communicating with it. And if device is not working, the control valve won't work properly.
Examine the vent port of the control device (pilot or liquid level controller). If the vent port looks like it has dirt stuck around it, your supply gas is probably wet. After exhausting the wet gas, dirt will begin to stick to the moisture.
If this is the case, move your tubing to pull supply gas from a high and dry spot or consider using compressed air for instrument supply.
6. Use the Star Pattern to Tighten Flange Connection
When installing a control valve with a flanged connection, tighten the bolts in a star pattern, just like you do on a car wheel.
One side cinched down too much doesn't create a good seal. Also, any time you are replacing a flanged valve, make sure to replace the flange gaskets. Using a damaged flange gasket can lead to issues.
7. On a Threaded Valve, Use Sealant
When installing a valve with a threaded connection, use Teflon tape or pipe dope (or both) on the threads. This helps seal the connection to prevent leaking and protects the threads.
Bonus: Use 2 control Valves for dump applications!
Recently, many producers in the Permian and Mid-Con have begun using 2 High Pressure Control Valves in dump valve applications on their separators.
These producers are seeing decreased down time and reduced operational costs as a result of this method.
This dual dump design provides redundancy, so you don’t have to stop production to perform repairs. The reason is obvious—if the trim from one valve fails, you can isolate it and divert the flow to the second valve.
This solution also allows for greater variability in production volume. You can install two smaller valves rather than one large valve. You can flow both dump valves in early high-volume production. As production rates decline, you can move down to one valve and repurpose the other on a different application.
Explore More
Video Training on the High Pressure Control Valve
The 3 Most Important Factor for Selecting the Right Control Valve
To speak with an expert about more control valve installation best practices, contact your local Kimray store or authorized distributor.