The Low Pressure High Volume Valve is for oil and gas producers who want to extend production time through flowback and in erosive applications.
It provides long-lasting, robust control of low-pressure applications that allows you to keep your well running longer.
Kimray Liquid Dump Valve bodies can last decades, but the internal components can require maintenance in harsh environments to achieve peak performance.
In this video, we show you how to do a complete repair.
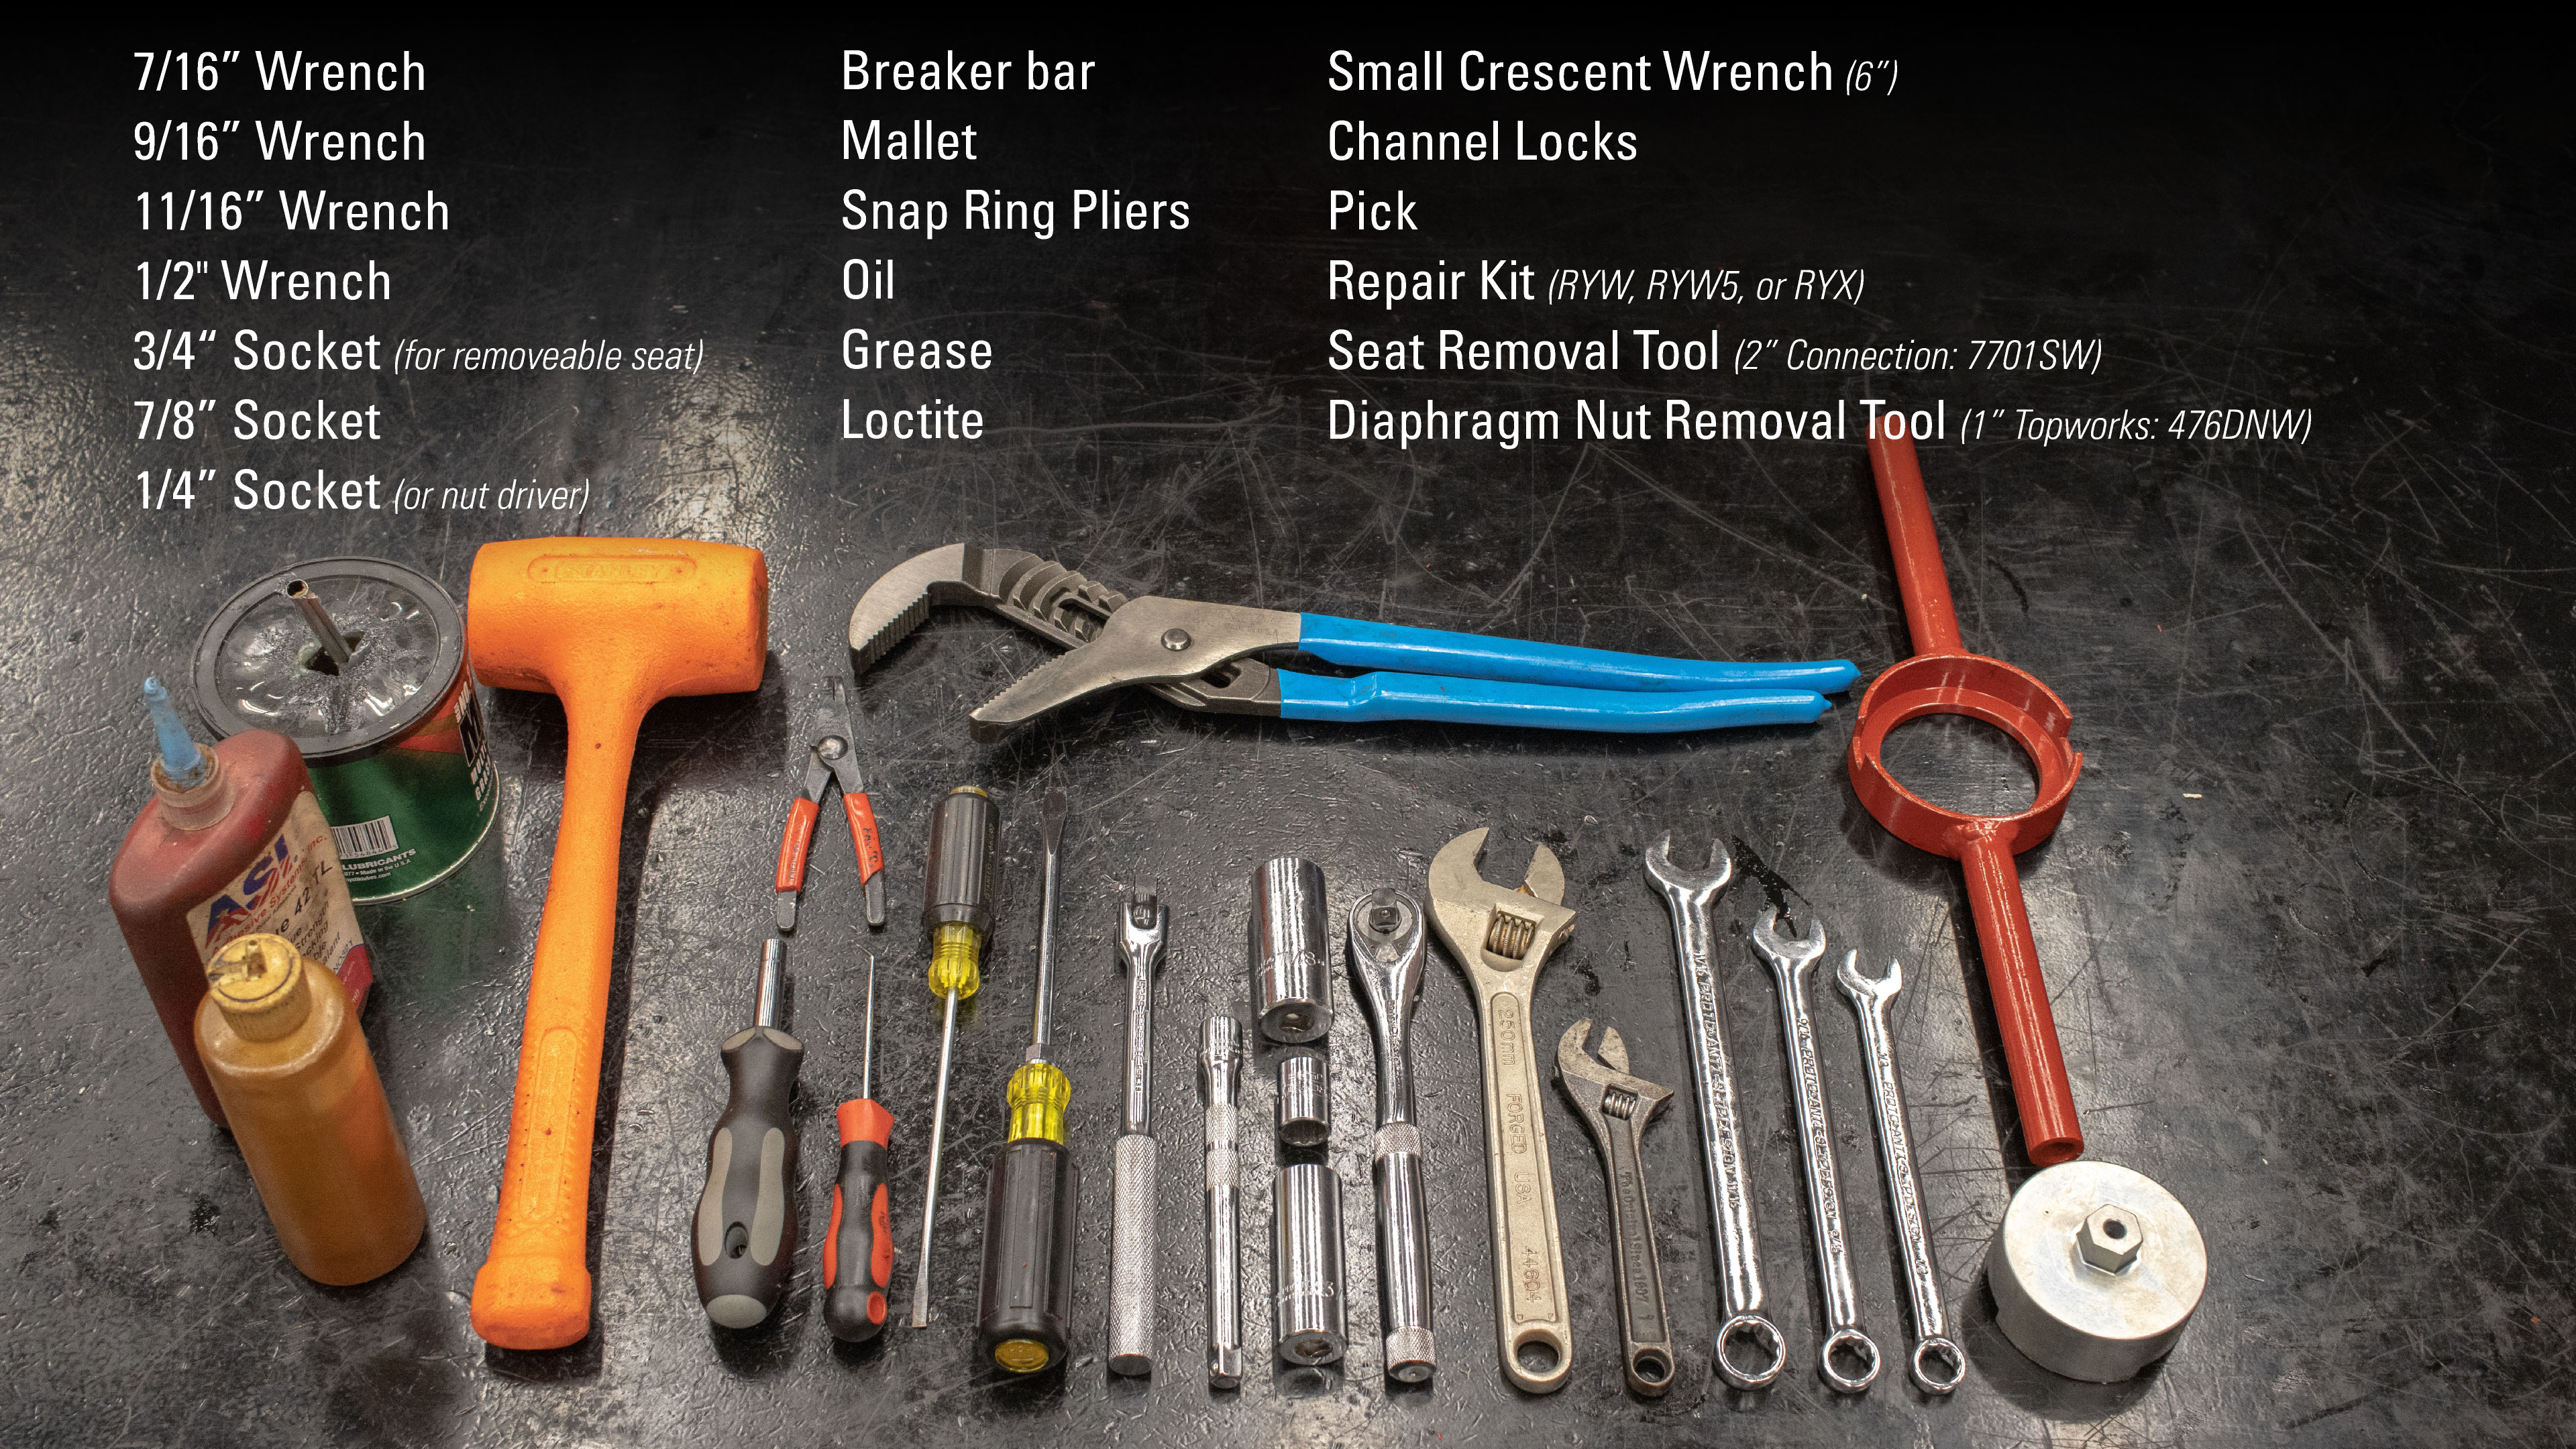
What you need to repair the Dump Valve
- 7/16” Wrench
- 9/16” Wrench
- 11/16” Wrench
- 1/2" Wrench
- 3/4" Socket (for removeable seat)
- 7/8” Socket
- 1/4” Socket (or nut driver)
- Breaker bar
- Mallet
- Snap Ring Pliers
- Oil
- Grease
- Loctite
- Small Crescent Wrench (6”)
- Channel Locks
- Pick
- Repair Kit
- Kimray Seat Removal Tool (2" Connection: 7701SW)
- Diaphragm Nut Removal Tool (1" Topworks: 476DNW)
As an alternative to a complete repair with a repair kit, you can use a replacement plug assembly. This assembly includes the ratio plug, removable seat, stem, 2 backups, piston seal, piston, seat disc and gasket all in one pre-assembled unit.
This makes for a faster, simpler alternative to a full repair and could save you time in the long run if during your repair you find you need to replace something like a worn ratio plug or bent stem.
Before performing any service, verify all system pressures are bled-off or properly isolated. Consult your company’s safety guidelines and requirements. Follow all regulations and wear all necessary PPE.
Disassembly
- Clamp the valve body in a vise.
- Using a crescent wrench, remove the upper adjusting screw. The pivot may also come off at this point. If it doesn’t, you can remove it after taking off the bonnet.
- Use a pick to remove and discard the O-ring from the screw.
- Use a 9/16” wrench or socket to remove the breather plug.
- Remove the bonnet bolts and take off the bonnet
- Using a pick if needed, remove the pivot (if it did not come out previously), upper spring plate, spring, and lower spring plate.
- Next, unthread the diaphragm plate from the upper stem. There are two flats on the upper stem where you can put a wrench to stabilize it.
- The diaphragm needs to be inspected for any abnormal wear like punctures or swelling. If it is damaged, you will need to order a replacement because it is not included in the repair kit.
- It’s also good to inspect under the diaphragm nut. However, to remove this or to replace the diaphragm, you will need the Kimray diaphragm nut removal tool. Put the tool on the diaphragm nut and put the diaphragm plate into the vise. Unthread the nut.
- Now you can inspect the diaphragm fully. If the diaphragm is undamaged, replace the diaphragm nut. If it is damaged, remove and discard the diaphragm.
- Remove the coupling block with a ¼" socket or nut driver.
- Use a ½" wrench to remove the four bolts from the yoke base.
- With the yoke off the body, empty the oil from the yoke into an appropriate container.
- Remove the upper stem then flip the yoke over.
- Use a 7/8” socket to remove the lower adjustment screw. If it doesn’t come easily, use a breaker bar.
- Remove and discard the snap ring, retainer, felt wiper, outside O-ring, and inside O-ring from the lower adjusting screw.
- Use a 9/16” wrench to remove the stuffing bonnet bolts.
- Remove the stuffing bonnet assembly and piston assembly from the valve body. You may need to use one or two flathead screwdrivers and a mallet to pry it off.
- Remove the valve body and place the stuffing bonnet upside down in the vise.
- Use large channel locks to unthread the cylinder from the stuffing bonnet.
- Remove and discard the O-ring from the bonnet.
- Use a pick to remove the spring and spring follower. (The spring follower may be attached to the spring itself.)
- Remove the stuffing bonnet assembly from the vise.
- Remove the snap ring, retainer and felt wiper from the stuffing bonnet assembly.
- Use a screwdriver or pick to push the Teflon packing out.
- Remove the O-ring the from the cylinder.
- Use a mallet to tap down on the piston assembly and remove it from the cylinder.
- Next, remove and discard the O-ring and two backups from the piston.
- Now put the stem in the vise using the two flats.
- Using the shaft of a large screwdriver or the side of a wrench, carefully remove the ratio plug.
- Remove the seat disc. This is reversible and can be flipped to use the other side or replaced with a new disc from the repair kit.
- With the valve fully disassembled, we’re ready for inspection and assembly.
Inspection
- Inspect each component for damaged threads, scoring or scratching that could result in a leak path. Pay careful attention to the stem, cylinder, and ratio plug. If there is damage, you will need to replace those components.
- If the removable seat is damaged, you will need to order a replacement and identify the required torque specs for that repair. You’ll also need a specific Kimray tool to remove the seat, called the Seat Removal Tool (7701SW for 2”; 7699SW for 3”).
- Use a pick to clear the breather plug of any debris.
Assembly
- Begin by putting the O-ring and two Teflon backups on the piston.
- Put the piston stem in the vise and install the cylinder and removeable seat.
- Apply Loctite to the threads on the stem, and then thread on the ratio plug. (Use primer if available to clean surface and help seal faster.)
- Tighten the ratio plug until the seat no longer spins. Then remove the piston assembly from the vise.
- Put the new felt wiper, retainer, and snap ring into the top of the stuffing bonnet.
- Flip it over and the put it in the vise.
- Slide the four packing rings on the Teflon packing sleeve.
- Apply grease in the stuffing bonnet and slide in the packing sleeve, flanged end first.
- Insert the packing follower and spring.
- Use an appropriately sized tool to push the spring down so you can engage the threads of the cylinder.
- Put the new O-rings on the stuffing bonnet and cylinder.
- Pushing down with your hand to engage the threads, thread the cylinder on about three rotations.
- Add grease to the teflon backups and O-ring of the piston assembly.
- Use a mallet to slowly tap the piston assembly into the cylinder.
- Use large channel locks to firmly tighten.
- Remove the stuffing bonnet from the vise and replace it with the valve body.
- Grease both O-rings on the stuffing bonnet assembly.
- Line up the bolt holes, also making sure that the topworks holes face the correct direction.
- Use a mallet to tap the stuffing bonnet into the valve body.
- Hand start the bolts and then tighten in a star pattern.
- Install the felt wiper, retainer and snap ring into the lower adjusting screw.
- Install the inner O-ring and outer O-ring and apply grease to both.
- Turn the yoke upside down and install the adjusting screw into the yoke with a 7/8” socket.
- Then grease and install the stem. Be careful not to damage the inner O-ring.
- To assemble the diaphragm assembly, first put the diaphragm plate into the vise.
- Grease the diaphragm and thread it onto the plate.
- Grease and install the diaphragm nut making sure to not overtighten it and deform the diaphragm.
- Attach the yoke by tightening the four bolts into the stuffing bonnet.
- Add oil to the bowl (enough to at a minimum cover the lower adjusting screw.)
- Next, apply Loctite to the stem threads.
- Thread the diaphragm assembly onto the stem. (If the upper stem is too high, tap with a mallet until it meets the lower stem.)
- Use an adjustable wrench to hold the flats on the stem while you thread the diaphragm assembly until it comes to a stop.
- Grease the inside of the diaphragm plate.
- Add the lower spring plate, spring, and upper spring plate and grease the top.
- Install the bonnet, aligning the communication holes on top and bottom.
- Thread the bolts onto the bonnet and tighten using a star pattern.
- Install the O-ring on the upper adjusting screw.
- Then add grease to the O-ring and the top of the adjusting screw.
- Place the pivot on top of the adjusting screw, using the grease to hold it in place.
- Make sure the spring plate is aligned and install the adjusting screw into the top of the bonnet with a crescent or 7/8" socket.
- Now install the breather plug.
- Lastly, attach the coupling block with a 1/4" socket or nut driver.
That completes your repair! For testing, calibration, or other questions, consult your local Kimray store or authorized distributor.