


A Pressure Reducing Regulator is used to maintain a downstream pressure set point. Pressure Reducing Regulators are often used as suction controllers on compressors.
In this video, we'll show you how to repair a 2" Pressure Reducing Regulator.
Helpful Documents
- Download Technical Specifications
- Download Installation, Operation & Maintenance Guide
- Download Kit Sheet
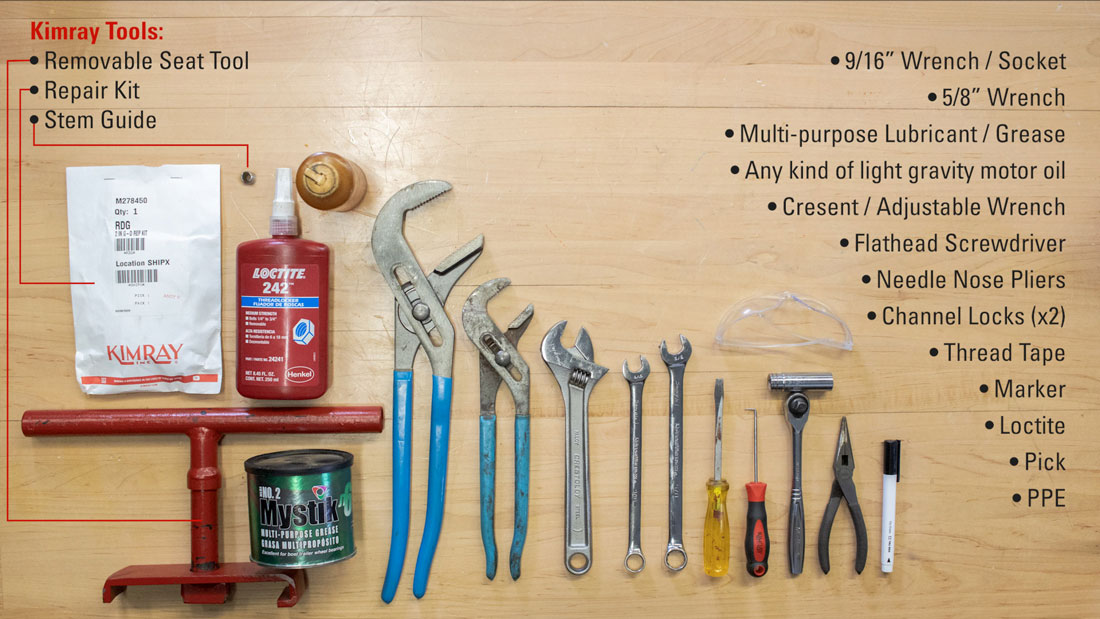
Tools Needed
- 9/16” Wrench / Socket
- 5/8” Wrench
- Channel Locks (x2)
- Crescent / Adjustable Wrench
- Multi-Purpose Lubricant / Grease
- Flathead Screwdriver
- Needle Nose Pliers
- Any kind of Light Gravity Motor Oil
- Thread Tape
- Marker
- Loctite
- Pick
Kimray Tools
- Removable Seat Tool (if removable seat is damaged)
- Repair Kit: RYG
- Stem Guide
How to Disassemble a Pressure Reducing Regulator
Before you begin disassembly, use a marker to make a mark on each layer of the valve. This way when you reassemble the valve, you'll be able to line up each piece correctly.
Bonnet & Pilot Housing
- Start by removing the adjustment screw and pressure gauge.
- Remove and discard the washer and packing seal. These will be in your repair kit.
- Use a 9/16” wrench to loosen the tubing connectors.
- Take the four main bolts out of the bonnet with a 9/16” wrench.
- Remove the bonnet from the pilot housing. You may need to use a screwdriver to pry them apart.
- Now remove both spring plates and spring.
- Remove the pilot housing. If it’s stuck from rust or corrosion, use a flathead screwdriver or similar tool to separate them.
- Use a 9/16 socket wrench to remove the pilot seat and diaphragm. Discard both; they will be in the repair kit.
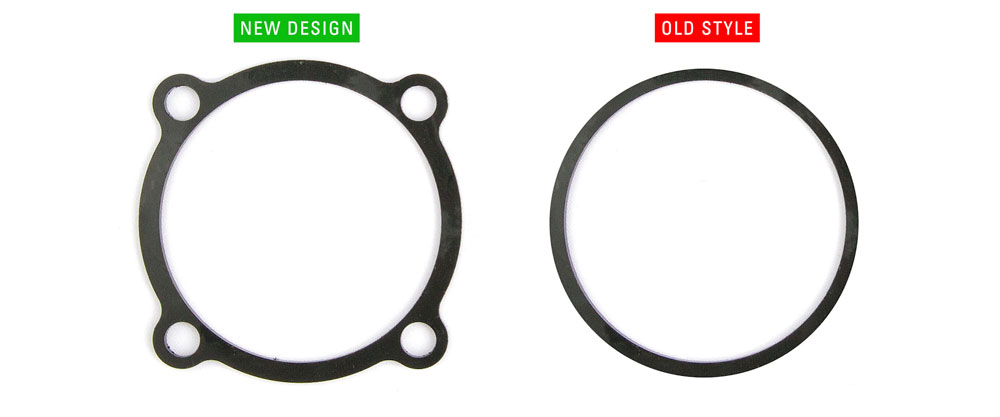
- Remove the spacer ring. If you have the old style, replace it with the new design. If you already have the new spacer, you can reuse it.
- Use two channel locks to remove the diaphragm nut from diaphragm plate and discard the diaphragm. We will be replacing this with the repair kit.
- Next, use a 9/16” socket to remove the lower seat and pilot plug.
- Use a pick to remove the gasket and spring. All these pieces can be discarded.
Upper Housing
- Now, remove all the upper housing bolts.
- Remove the tubing and then remove the upper housing.
- Once you’ve removed the upper housing, discard the diaphragm.
- Now, use a flathead screwdriver to pry loose the lower housing.
- Carefully discard the oil in the lower housing.
- Remove and discard the gasket and use a putty knife or similar tool to clean the gasket surface on top of the lower housing.
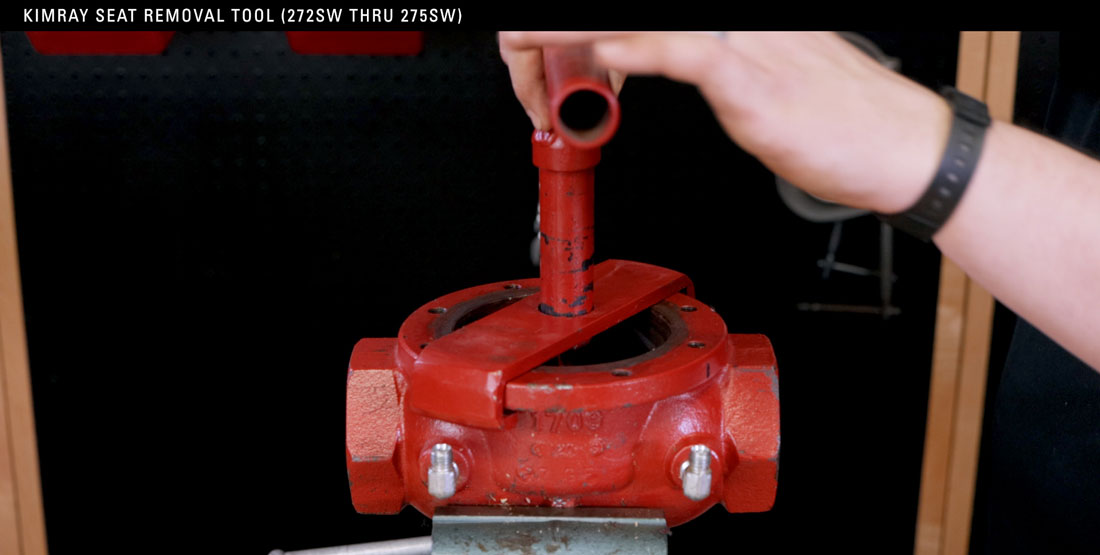
Removable Seat
- Once you’ve removed the lower housing, you’ll be able to see the removable seat in the body.
- If you have the Kimray seat removal tool, use it to take out the removable seat.
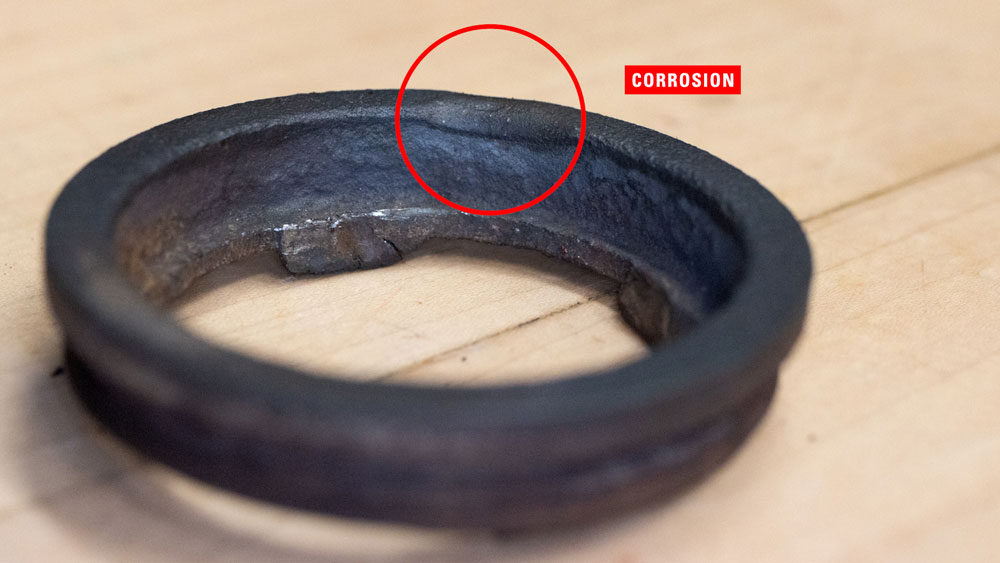
- If you’re doing this repair in the field or do not have the correct tool, only remove the seat if there are signs of corrosion, pitting or scoring. You may end up doing more damage to the seat by trying to pry it out.
- The repair kit includes a new gasket, but if you are replacing the removable seat, a new one will need to be ordered separately.
- Next, inspect the body for rust or debris that might clog your filter when the valve is in service.
- Use compressed air to clear the sense line communication port.
Lower Housing
Next, we’ll disassemble the lower housing.
- Put the diaphragm plate of the lower housing into the vise.
- Use a 9/16” wrench on the lock nut to remove the ratio plug, seat and seat disc.
- Discard the lock nut and seat.
- Keep the ratio plug and seat disc.
- Remove lower housing and then remove the spring.
- Examine for scoring or other signs of damage.
- Using a pick, remove and discard the two Teflon backups and the O-ring from the lower housing.
- Put the upper housing into a vise and use an adjustable wrench to remove the filter cap.
- Remove and discard the O-Ring from the filter cap.
- Remove filter screens with a pick and clear out any debris in the filter housing.
- With the valve fully disassembled, now is a good time to organize your workspace and open your Kimray repair kit (RYG (new version) or RDG (old version)) to prepare for assembly.
Cleaning
- Clean every part and clear all debris using a wire brush or rag. If you’re in a shop, you can use a parts washer. If you're in the field, you can use degreaser.
How to Reassemble a Pressure Reducing Regulator
- With the upper housing in the vise, replace the filter screens from the repair kit. This is easiest with the rounded edge of the filters facing down.
- Install the new O-Ring. Then re-install the cap.
- Put the body back in the vise. If you are replacing the removable seat, place the gasket from your repair kit on your removable seat. Be careful not to apply too much pressure to the gasket while installing so it doesn’t tear.
- Apply grease to gasket and the sealing surface in the body.
- Install the removable seat into the body with the Kimray Seat Removal Tool.
- Do not overtighten the seat. This also could cause damage to the gasket.
- Stretch the Teflon backup slightly to make it look like a spring. Insert one end of the backup into the lower housing and use a pick to rotate it in a counterclockwise motion until it’s fully installed.
- Next install the O-ring. Pinch and fold it to make it easier to install in the lower housing.
- Push the O-ring and first Teflon backup all the way down to the bottom of the lower housing channel to make room for the last backup.
- Insert the second backup into the lower housing and rotate counterclockwise.
- Add grease to the Teflon backups and O-ring.
- Install the spring around the lip in the lower housing.
- Next, install the stem into the lower housing. It's best to use a Kimray stem guide to avoid sheering your O-ring.
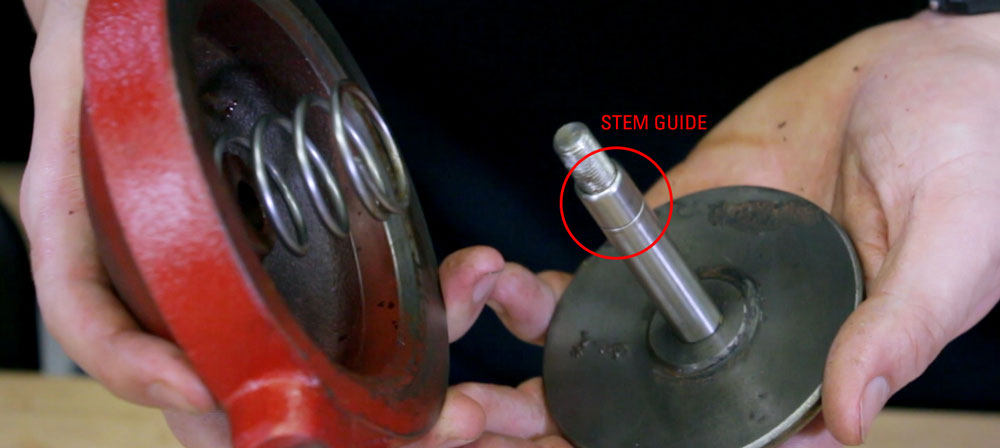
- Fully insert the stem into the housing, then remove the stem guide.
- Put the lower housing into a vise, clamping down on the diaphragm plate.
- Install the seat disc, new seat and ratio plug.
- Hand start the lock nut on the threads of stem.
- Use a 9/16 socket to tighten to the point where the seat disc no longer rotates. It’s critical not to over-tighten because it can deform the seat.
- Apply grease to the lip of the lower housing.
- Then install the gasket and apply grease on top.
- Remove the lower housing and put the valve body into the vise.
- Now put the lower housing assembly into the valve body. As you assemble the valve, follow the markings you made before disassembly.
- Fill the oil bowl with any kind of light gravity motor oil until the communication hole is covered.
- Install the main diaphragm and mount the upper housing on the body.
- Hand-start the bolts, re-install the tubbing, then fully tighten the bolts in a star pattern.
- Insert the spring into the upper housing large side down.
- Install gasket onto seat.
- Insert the pilot plug into the seat and hand thread it into the upper housing. Use a 9/16” socket to tighten it down, being careful not to over-tighten the seat.
If you've done everything correctly, you should feel the resistance of the spring as you push down on the pilot plug.
- Put the diaphragm on the diaphragm plate.
- Then, thread on the diaphragm nut.
- Use two channel locks to tighten the assembly.
- Use the spacer ring as a guide to for the diaphragm to know when it is tight enough.
- Install the diaphragm onto the seat.
- Place the sensing diaphragm on top of the pilot housing.
- Thread the seat into the upper diaphragm plate through the pilot housing. Use the 9/16" wrench to fully tighten the seat.
- Make sure the pilot plug and pilot diaphragm are both centered.
- Then, install the pilot housing on the upper housing.
- Add grease to the diaphragm plate, without covering the hole.
- Now install the spacer ring, spring plates and spring.
- Apply grease to the top spring plate.
- Place the bonnet on the valve and start the bolts by hand.
- Install the rest of the tubing and then fully tighten the bonnet bolts.
- Reinstall the pressure gauge with thread tape.
- Lastly, attach the new washer and packing seal to the adjustment screw and thread it into the bonnet.
If you have any questions about any part of this repair process or the custom Kimray tools used, reach out to your local Kimray store or authorized distributor.

POSTED IN: