Bending metal tubing is a critical function for pneumatic devices in the oil and gas industry. In this video, we'll equip you best practices, tips, and tricks to ensure that your tube bending and fitting installation is accurate, consistent, and safe.
EQUIPMENT NEEDED
- Hand Tube Bender
- Marker
- Tubing Cutter
- Deburr Tool (may be on cutter)
- Tubing
- Fittings
- Thread Sealant / Loctite
- 11/16” wrench
- 5/8” wrench
- Measuring Tape/Ruler/Protractor (optional)
FITTINGS
Components
We’ll start by looking at a fitting which includes four parts: the body, nut, front ferrule and back ferrule.
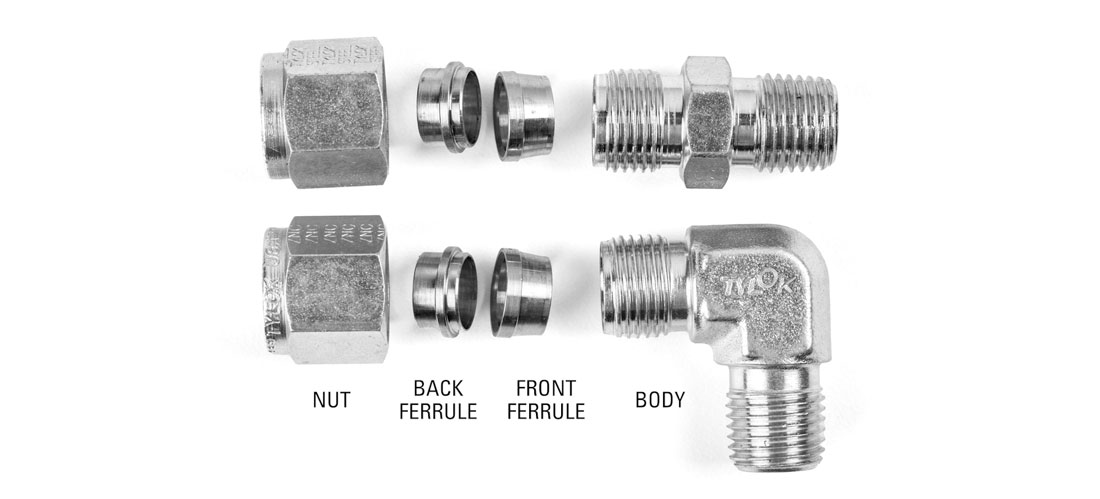
Generally, you don't want to take these apart ahead of time to avoid the possibility of getting any dirt or debris inside. It’s good to know what the parts are, so when you’re putting it together, you know how to layer the components.
For all fittings on control valves and equipment, we suggest using a thread sealant such as Loctite rather than Teflon tape to avoid the potential of any tape getting inside the equipment.
Installing Fittings on Device
We recommend planning out a path ahead of time so you can avoid tubing that crosses paths if possible. Taking some time up front to figure out your paths can save you material and make your bends easier. On our packages, we like to keep all the tubing as close to the valve body as possible to keep it out of the way.
If you’re installing a straight connector, you can fully tighten it when you install it since there’s only one way the tube can go in. However, to give yourself a bit more flexibility, don’t fully tighten any 90° or elbow fittings until the tubing has been installed.
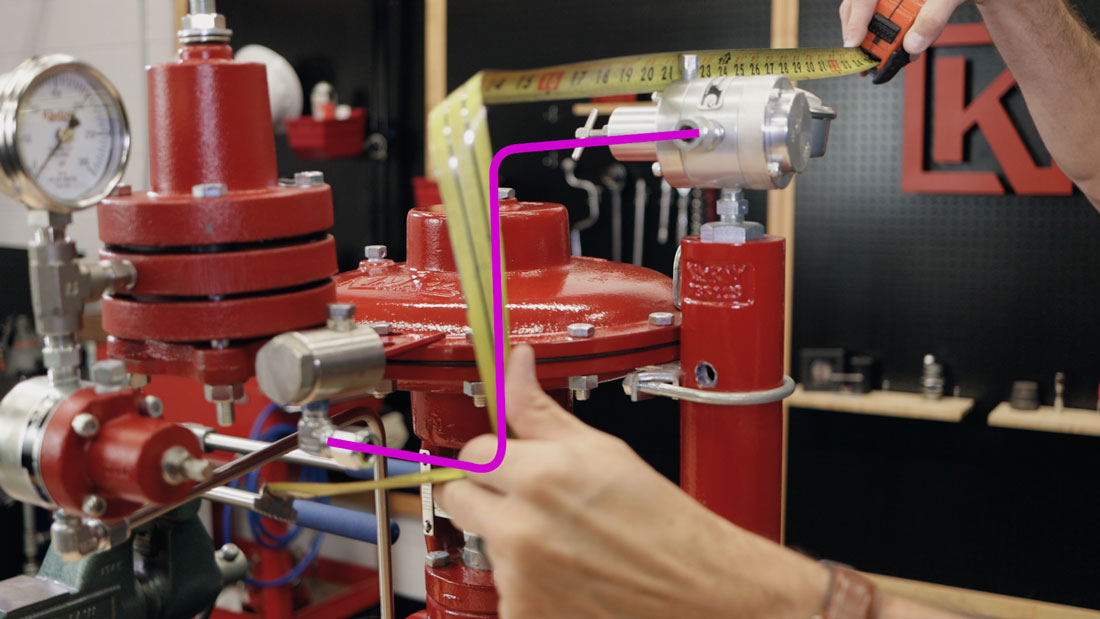
For this high pressure control valve package, we’re going to start by connecting the upstream side of the valve to the sense line.
Apply sealant to the connection. Since it’s a 90° elbow fitting, we won’t tighten it all the way yet.
HOW TO BEND TUBING: 90°
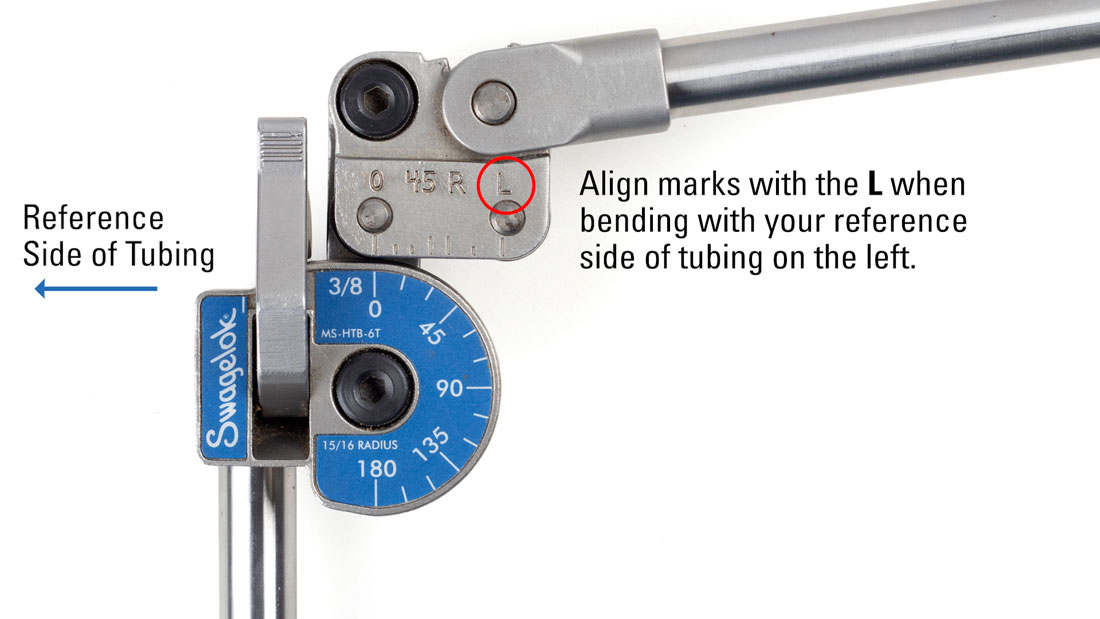
One of the first things you can do on your tubing is make an end reference mark. This mark will make sure you always know which side of the tube is your reference side, which will go to the left of your bender.
This first measurement will be taken from the where the tubing touches the bottom of the nut to the center of where the bend will be. I’m going to use a piece of scrap tubing to get an estimate of where this bend needs to be.
Insert your tube into the fitting, then measure and mark where you’ll make the 90° bend. This mark will be the centerline radius (CLR) or bend radius. CLR is determined by the die size of the tubing benders.
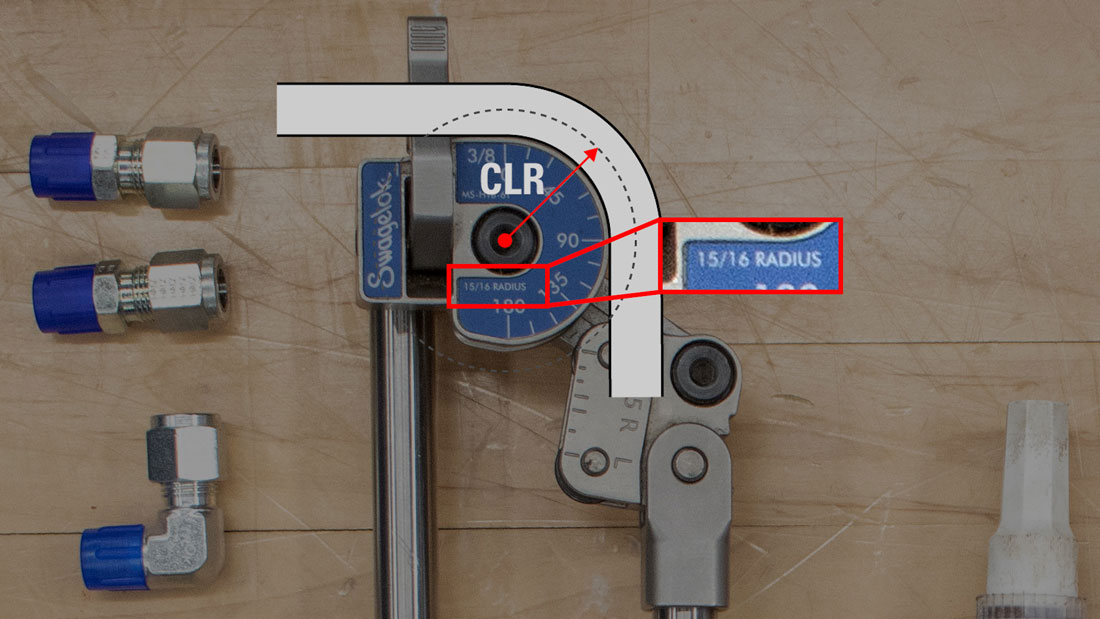

It can be helpful to mark the whole circumference of the tube so that no matter how it’s inserted into the bender, you can still see the line.
You can easily put this tool in a vise as we’re doing to help keep it steady and leave your hands free to control the tubing.
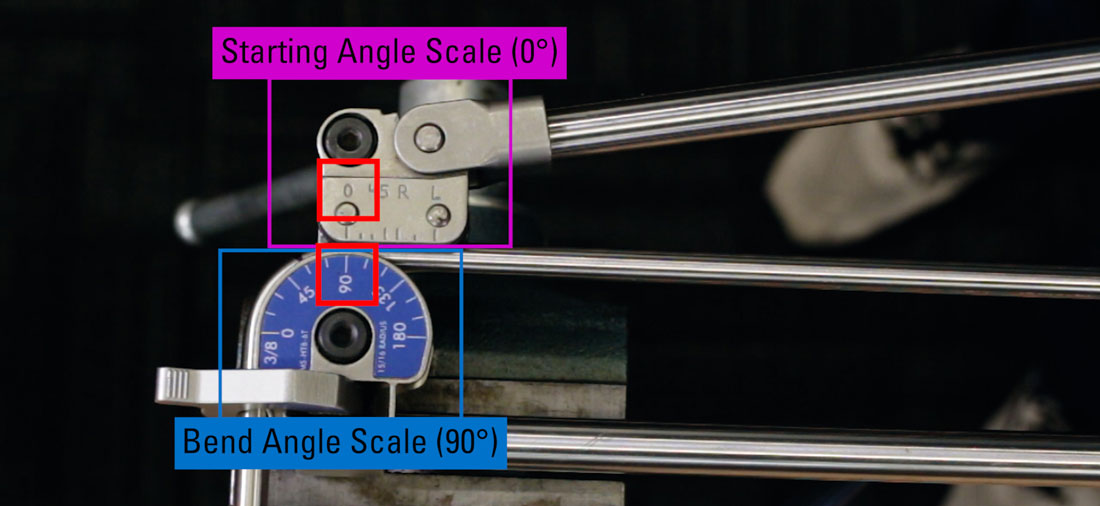
Lift the short arm of the bender and insert the tube into the jaw of the bender. Align both zero markers on the tool, then adjust the tube until your mark is aligned with the “L” position. For 90° bends, you always align your mark with the “L”. Our reference side is on the left, so that’s why we use the “L”. If the reference side is on the right, you would use the “R”.
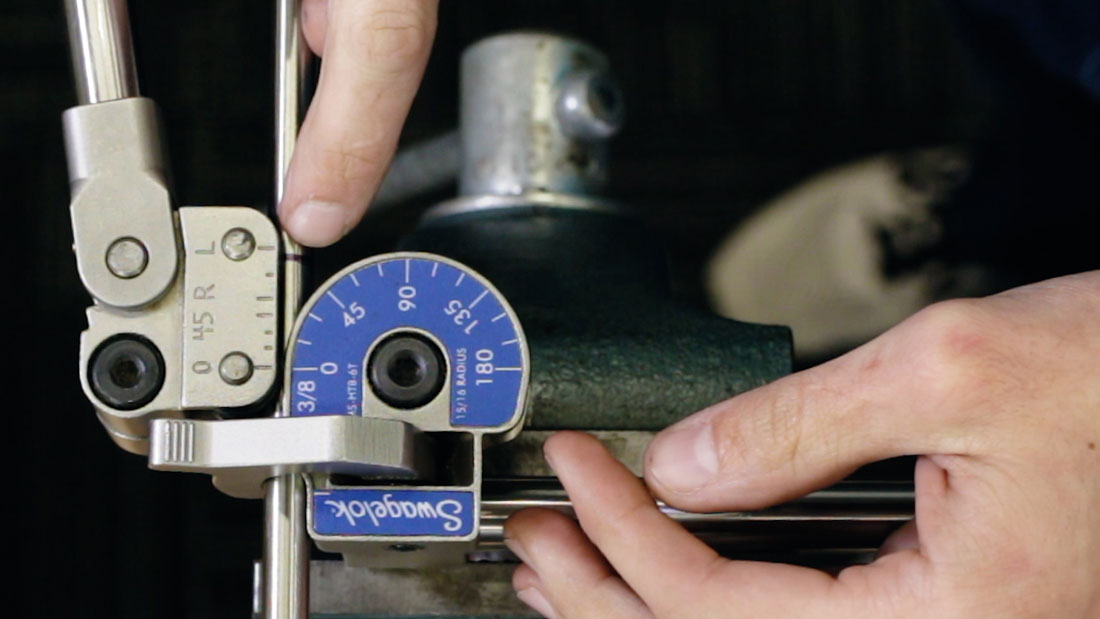
Tighten the tube latch and make your bend. The “0” on the arm (or roll support) will be your indicator for the degree of bend you’re making. Pull the arm down until you reach the 90° mark.
SPRINGBACK
You may need to bend slightly more than your target angle to compensate for angular springback, which is how the tube will spring back a few degrees when released. Don’t over bend it too far—you can always go back and add more, but you can’t reduce an angle after it’s made.
CUTTING THE FINAL LENGTH
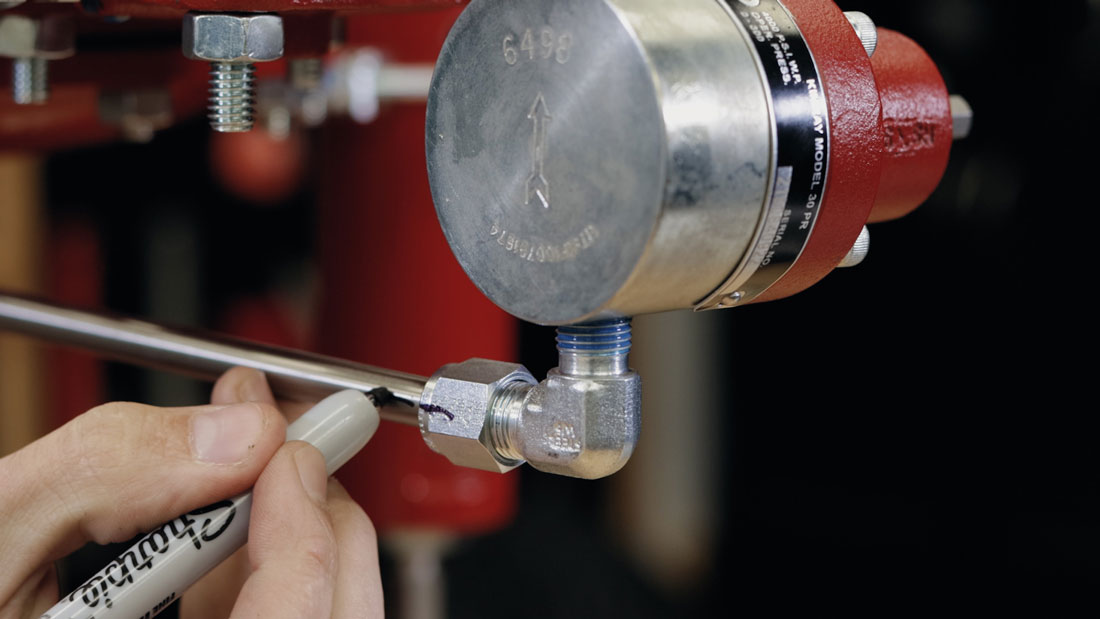
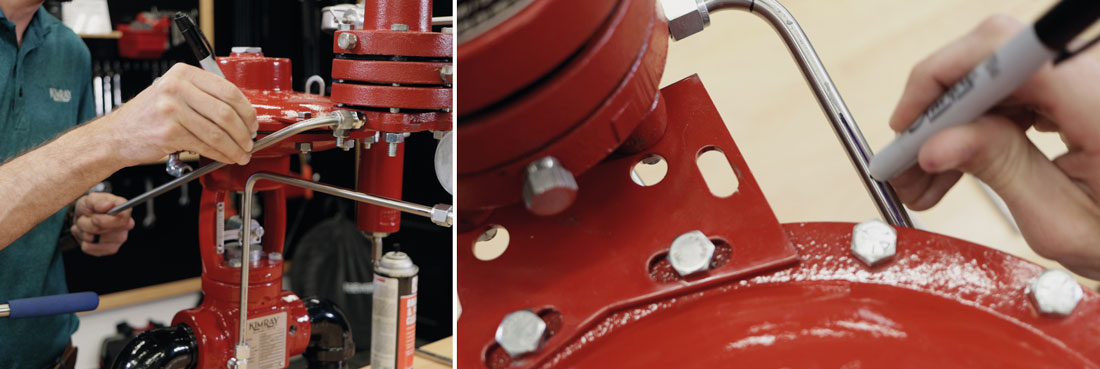
Now we’ll be cutting our bent tube to length. Insert the tubing in one fitting and make a mark where it aligns with the shoulder of the fitting body.

A tubing cutter works by rotating around the tubing and gradually tightening the cutting wheel until it cuts through the tubing.
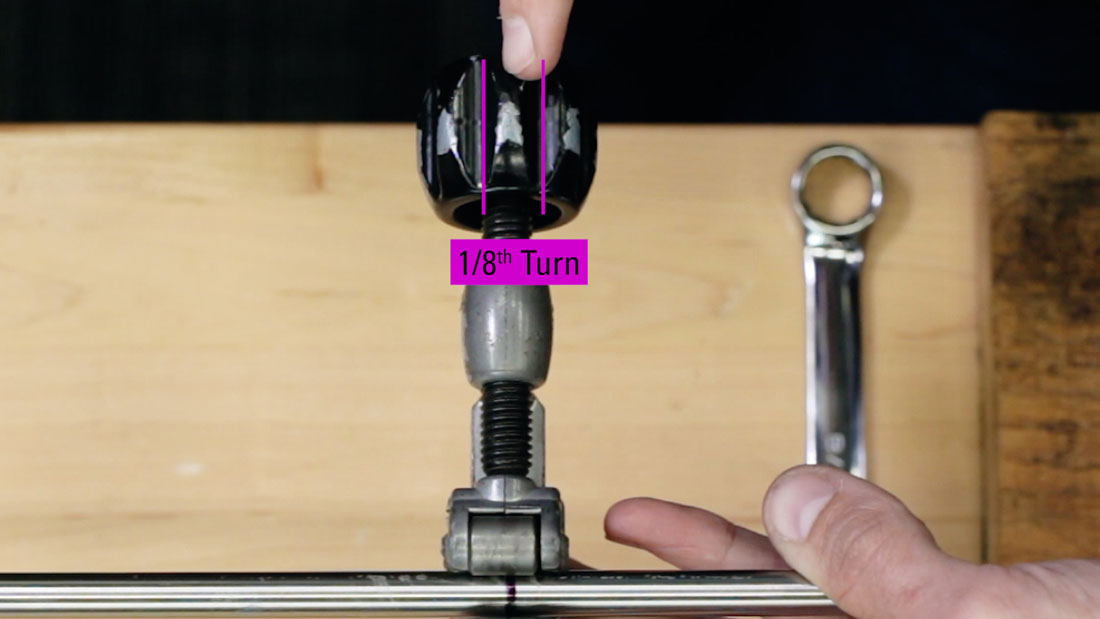
Position the mark in the cutter. Turn the handle until the wheel touches the tubing. Then turn the handle an extra 1/16-turn. The marks on the handle indicate an 1/8-turn, so use that as a reference.
Rotate the cutter around the tube. After every second rotation, turn the handle about a 1/16th of a turn until the tube is cut through.
DEBURRING
After cutting the tubing, use a deburring tool to remove any sharp edges or burrs from the tubing. This is an important step to ensure that the tubing fits securely into the fittings without causing any damage.
INSTALL TUBING / TIGHTENING FITTINGS
To keep track of the amount of rotation, you can mark the tubing and nut in its starting position. Hand-tighten the nut and then turn another 1 or 1-¼ turns with a wrench. Overtightening can put too much pressure on the fitting. Do this for both fittings.
HOW TO BEND TUBING: TWO 90°
Fittings & First 90°
For our second connection, we’ll be using a straight connector and one elbow. First, apply sealant to the connection. Fully tighten the straight connection then hand start the elbow connector leaving a half turn to make the installation easier later.
For this piece of tubing, we’ll need two 90° bends. Measure to get a rough estimate of the length of tubing you’ll need.
Cutting a long piece of straight tubing is difficult to hold on to while cutting, so you can lightly put it in a vise if you need. We’ll do a final length cut later.
A quick trick you can use to get measurements for a bend like this is to use your tubing set in the connector and some scrap tubing in the other connector. Line them up by eye and use a straight edge or a level to get a more accurate measurement. Make your mark on the center line.
Using the same techniques as the other bend, insert the tubing, align the zeros and put your mark at the “L”. Clamp down with the latch and bend to the 90° mark.
Second 90°
For our second 90° bend, accuracy is more important now because we must reach our fitting perfectly. Return the bent tube to the fitting, and slightly move the scrap piece of tubing so it can rest in its final position. Mark the center line on your tubing for your second 90° bend.
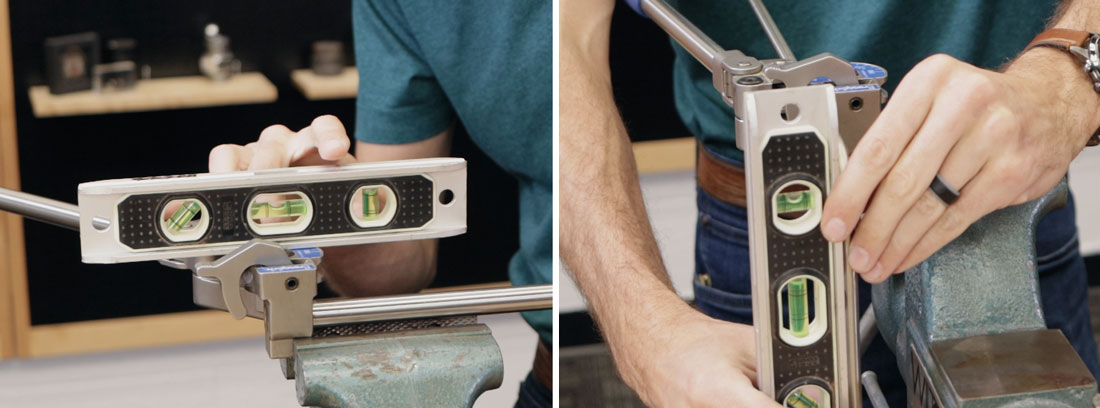
Before clamping the latch down all the way, make sure that your tubing bender is square with the bend you previously made. Check the level of the tool, then check the level of the previous bend.
Secure the latch, bend the arm down to bring the zero to the 90° indicator, maybe a little more, then release.
With the tubing back in the fitting, mark the final length based on the start of the shoulder of the fitting body. Make your cut, again tightening after every second rotation. Deburr the end and you’re ready to install.
Hand-tighten the fittings, mark a reference point and turn 1 to 1-¼ turns.
HOW TO BEND TUBING: 90° & OFFSET
On this example, we’ll be making a 90° and an offset bend.
First, we’ll measure for the first 90° bend. Use a piece of scrap tubing in one fitting and your actual tubing in the other. Use a level to mark where your centerline will be.
The length of tube before our mark is less than the allowable amount for this tubing bender. Since we know we will need the shortest amount of tubing possible before the bend, I’ll simply adjust it so the reference end of the tubing is aligned with the latch.
A best practice when you’re making two bends on a single tube is to make a reference mark on the top of the tubing, so you get the correct orientation of the bends.
Set in a scrap piece of tubing and measure the distance from the center line of the scrap piece to the center line of the fitting. In this case, 3”.
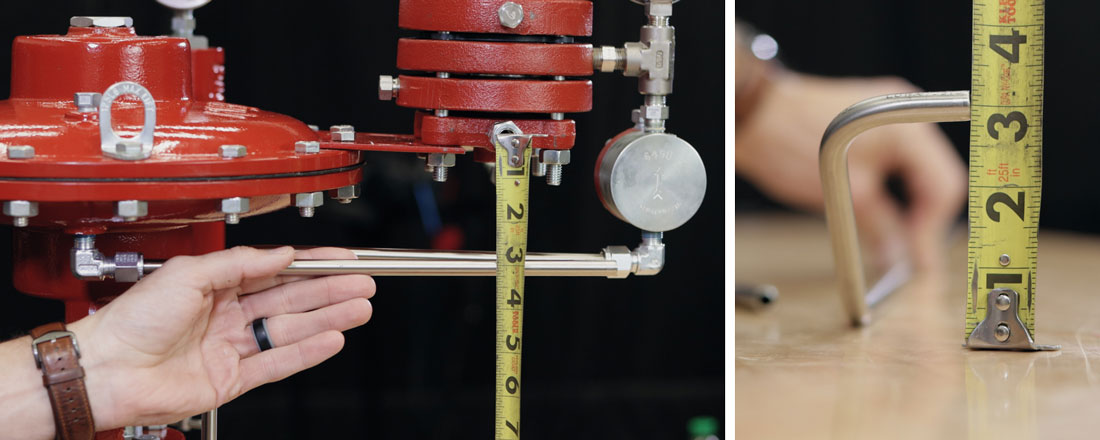
For this piece, the offset just needs to clear the bonnet or any obstructions. Make your mark and bend the tube, but for this bend, we’re not bending it to a certain angle, we’re bending it to achieve that 3” offset height.
For this bend use the mark you made earlier to help you align the tubing correctly for your next bend. You’ll need more precision on this second bend, so use a level to get your angle correct. Tighten the latch and make your bend.
This might be a little bit of a trial-and-error process, just don’t bend it too much. Bend it close, get a measurement and adjust from there.
The reason we’re doing it this way instead of mathematically is because it’s just not necessary for the type of connections we need to make here.
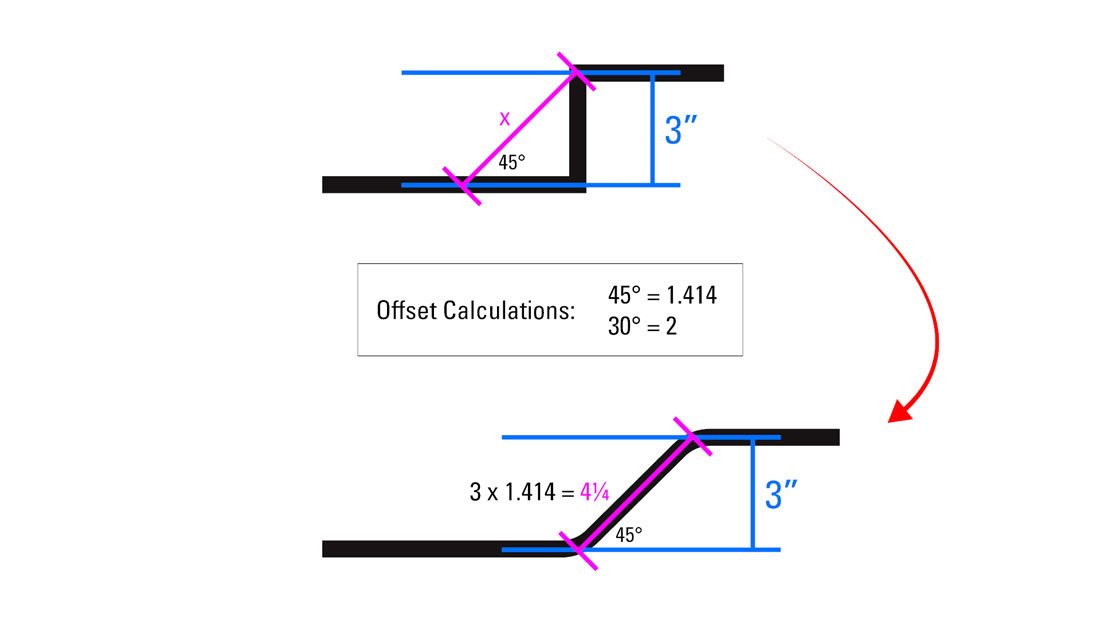
If you want to calculate the exact distance for an offset with two 45° bends, multiply the offset height by 1.414. That will be the length of tubing needed between the two centerlines of both 45° bends.
With our offset bend ready, mark the final length of tubing near the shoulder of the fitting. Make your cut and deburr the end. Once the piece is in place, make reference marks on the fittings and tubing to fully tighten the connectors.
HOW TO BEND TUBING: TWO 90° PLUS
For this connection, we’re going to use two straight fittings. The tube will have two 90°s. We’ll start by fulling tightening the fittings using sealant.
Take a rough measurement of the amount of tubing you’ll need. Each side will need to come out of the fitting and make a 90° bend.
Set the piece of tubing in the fitting and a scrap piece in the other. Use another piece of tubing to mark the location of the first bend. Fortunately for this one, we can simply eyeball the placement.
Make your bend as we have before — insert the tubing with the latch part way down, line up the zeros, align your mark to the L, tighten the latch, and make your bend.
With the piece back in the fitting on the body, make your second mark on the tube according to how it lines up with your scrap piece.
This bend will need to be level with the previous one. Check the level of the tool, then level the previous bend before making your second 90°.
Mark the tubing where it meets the shoulder of the fitting to make your final cut.
After deburring, insert the tube, hand-tighten the nut and then turn another 1 or 1-¼ turns with a wrench.