Today I'm going to walk through float-operated controllers, including both the Gen 3 Liquid Level Controller and the Pneumatic Level Switch, focusing on how they work and where they're used.
Float Operated Controller Applications
First, let's look at where you might see a Gen 3 or Level Switch in action.
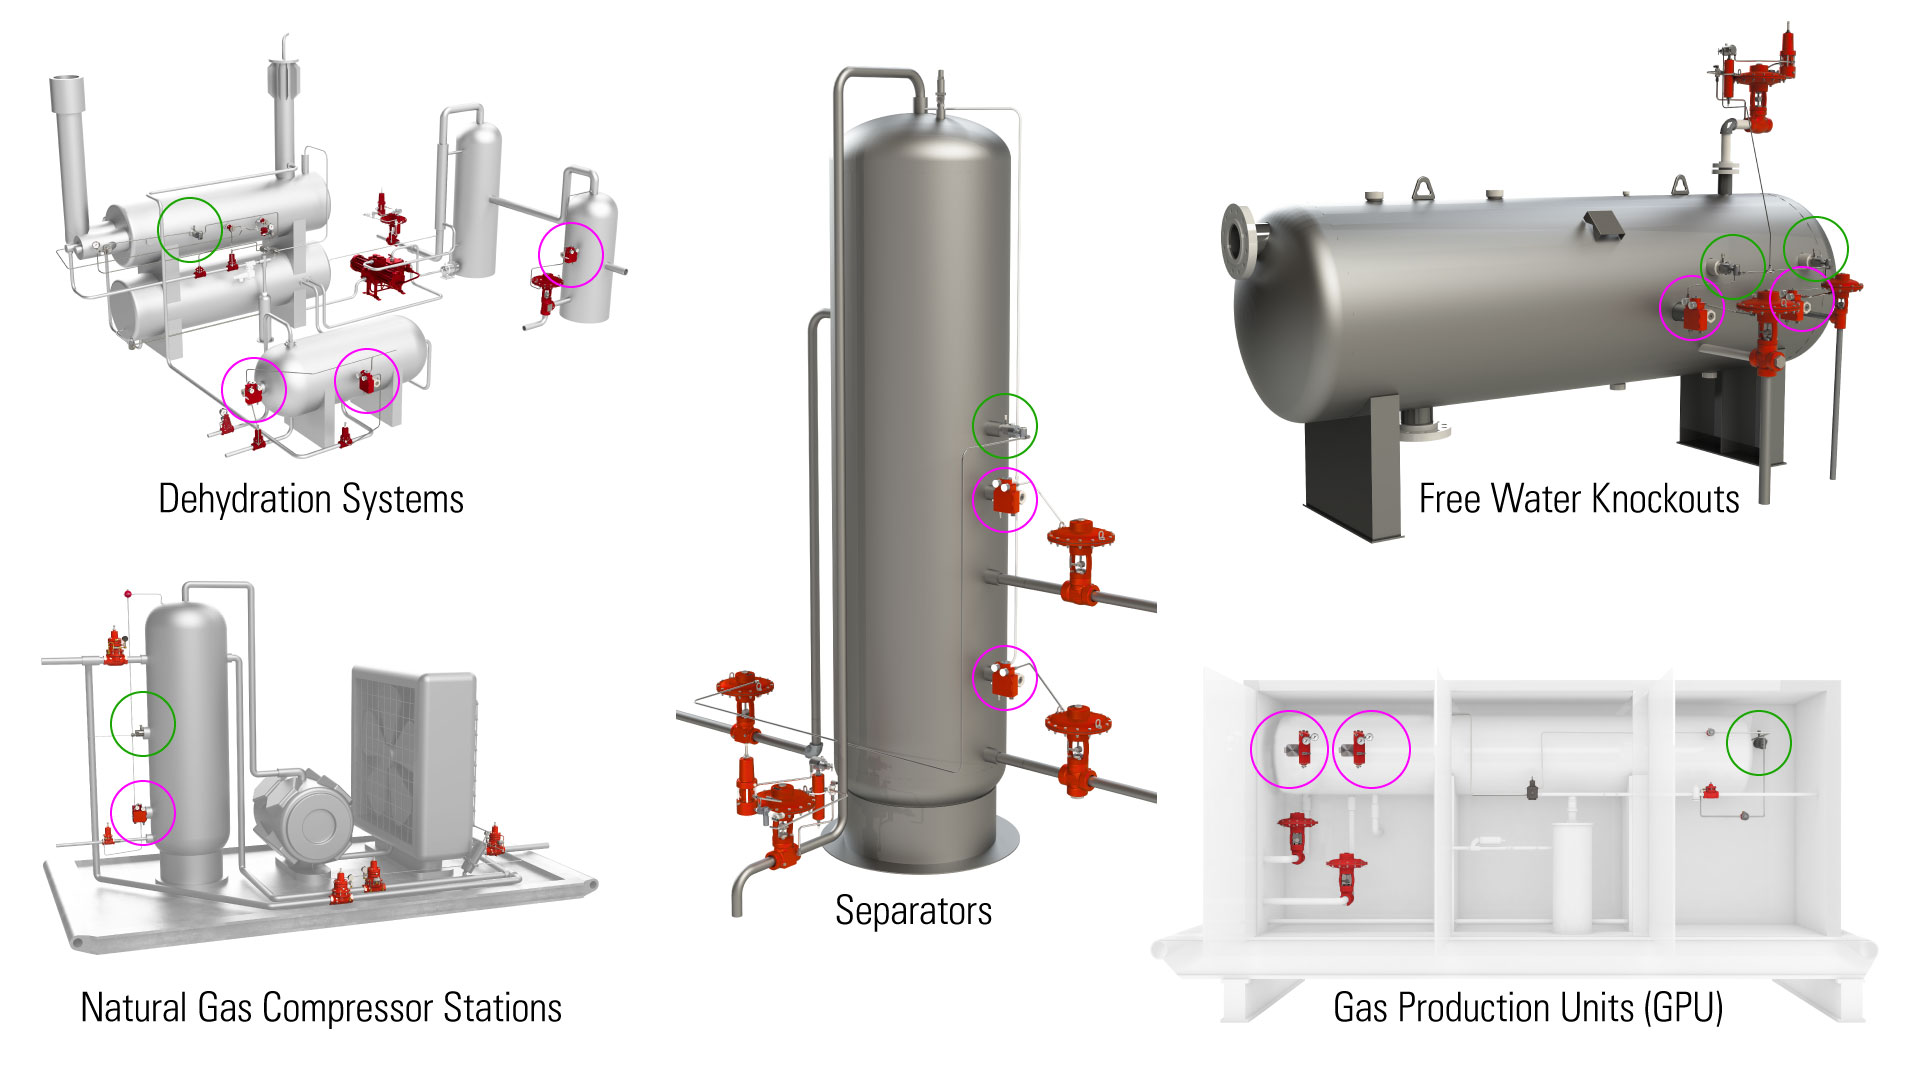
Producers use a Gen 3 Level Controller in any liquid accumulating vessel, including separators, heater treaters, and various separation equipment where they want to control the liquid level inside the vessel.
In gas production units, for example, Gen 3 level controllers are used for operating high pressure control valves, acting as dump valves, and for low-level shutdowns.
In a heated vessel, the level switch is crucial for preventing damage to the burner by ensuring it remains covered with liquid. On the other side of a gas production unit is a vessel that heats a coil of tubing to preheat the flow stream before it takes a pressure cut. If the liquid level drops below the burner tube it can cause damage to the burner, so you want to make sure the burner tube is completely covered with liquid, and that's the job of the pneumatic level switch in this application.
If liquid level drops below where that level switch is installed, it will shut down supply to the burner and the rest of the controls, shutting down the piece of equipment.
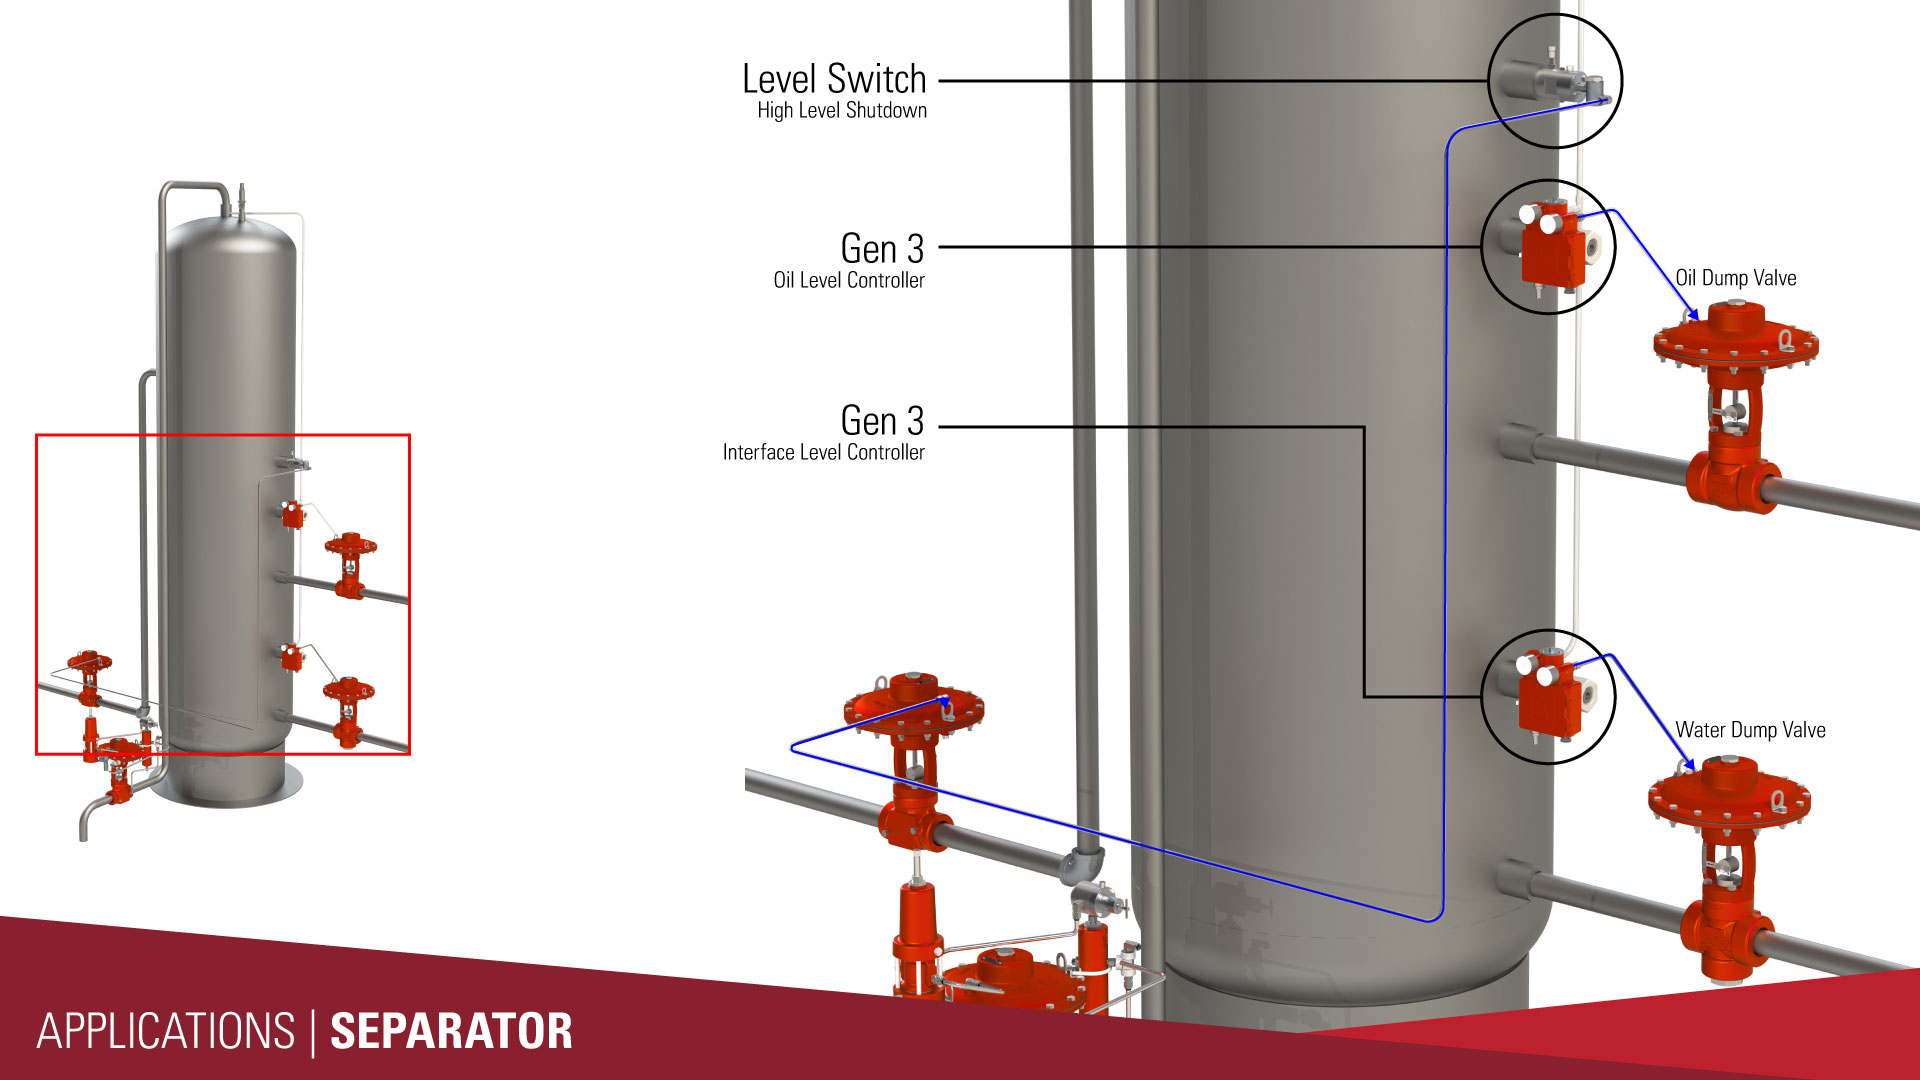
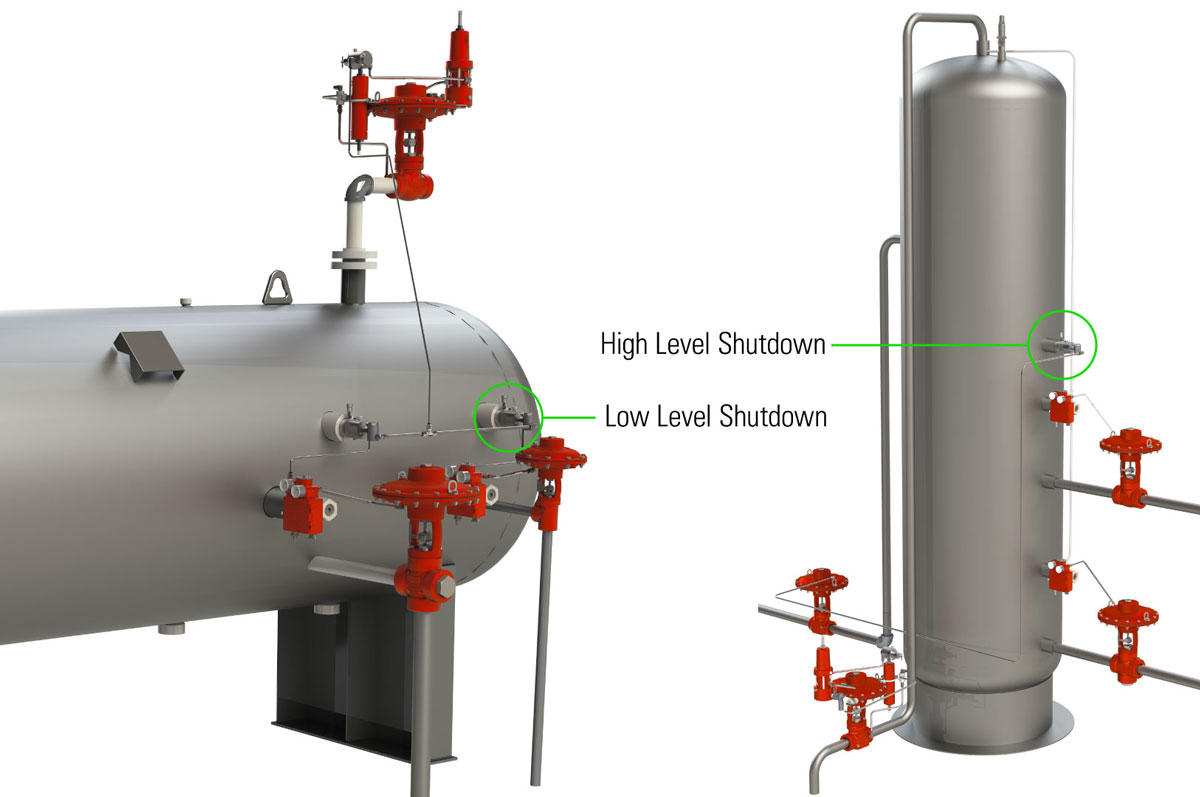
Another example of the Gen 3 and Level Switch being used is on a three-phase separator. Both the oil and the water dump valves are being operated by the Gen 3. The oil is on the top, and the water below. The displacer is sinking through the oil and only operating in the water. The oil is top level control, so it's only sensing the oil level inside of the vessel.
The level switch in this application is being used as a high-level shutdown. If it failed for any reason and liquid level began to rise in the vessel, instead of that liquid going out of the top of the vessel with the gas, once it hit that level switch it would shut down the controls or the inlet to the vessel. High- and low-liquid level shutdowns are common application for the level switch.
The output of the Gen 3 level controller can go to any control valve that requires 30 PSI signal to operate. That could be our high pressure control valves, it could be our low pressure control valves, or anything in between, just as long as it takes a pneumatic signal to actuate the valve 30 PSI up to 45 PSI. If you're using Kimray product, 30 PSI is all you need to supply the level controller to operate the dump valve.
Gen 3 Liquid Level Controller
Adaptable Displacers
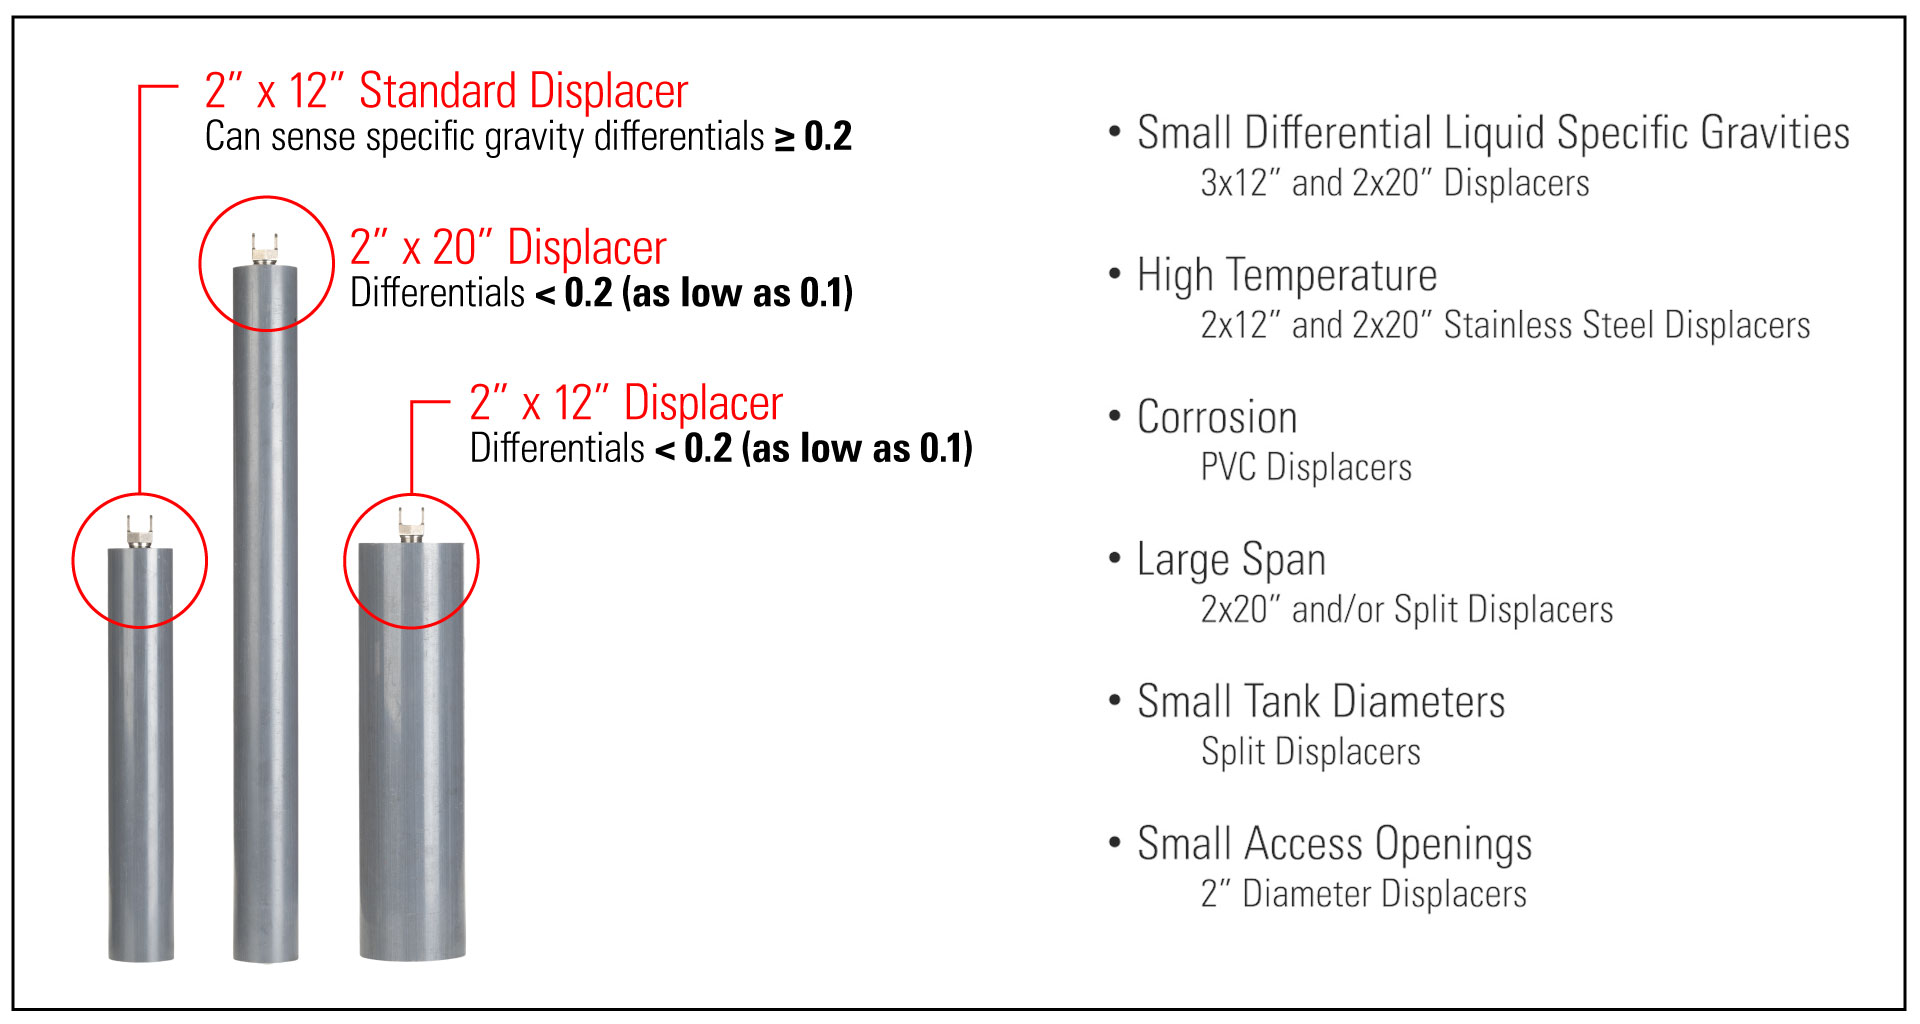
With standard displacers, the Gen 3 can operate in both water and oil applications. It's important to keep in mind that in interface level control, where you have oil on top of water and you're trying to control the water level, the specific gravity differential between the water and oil has to be at a minimum of 0.2.
So if your water is fresh water and it has a specific gravity of 1, that means your oil needs to be at least 0.8 or lighter with the standard displacer.
We also have 2"x20" and 3"x12" displacers, which give more surface area and more displacement. Those both have a minimum specific gravity differential of 0.1. If your oil is really close to the gravity of your water, we suggest using those larger displacers to control interface level. If you're using the Gen 3 in a 2” connection, just be aware that the 3"x12" displacer won't fit through that.
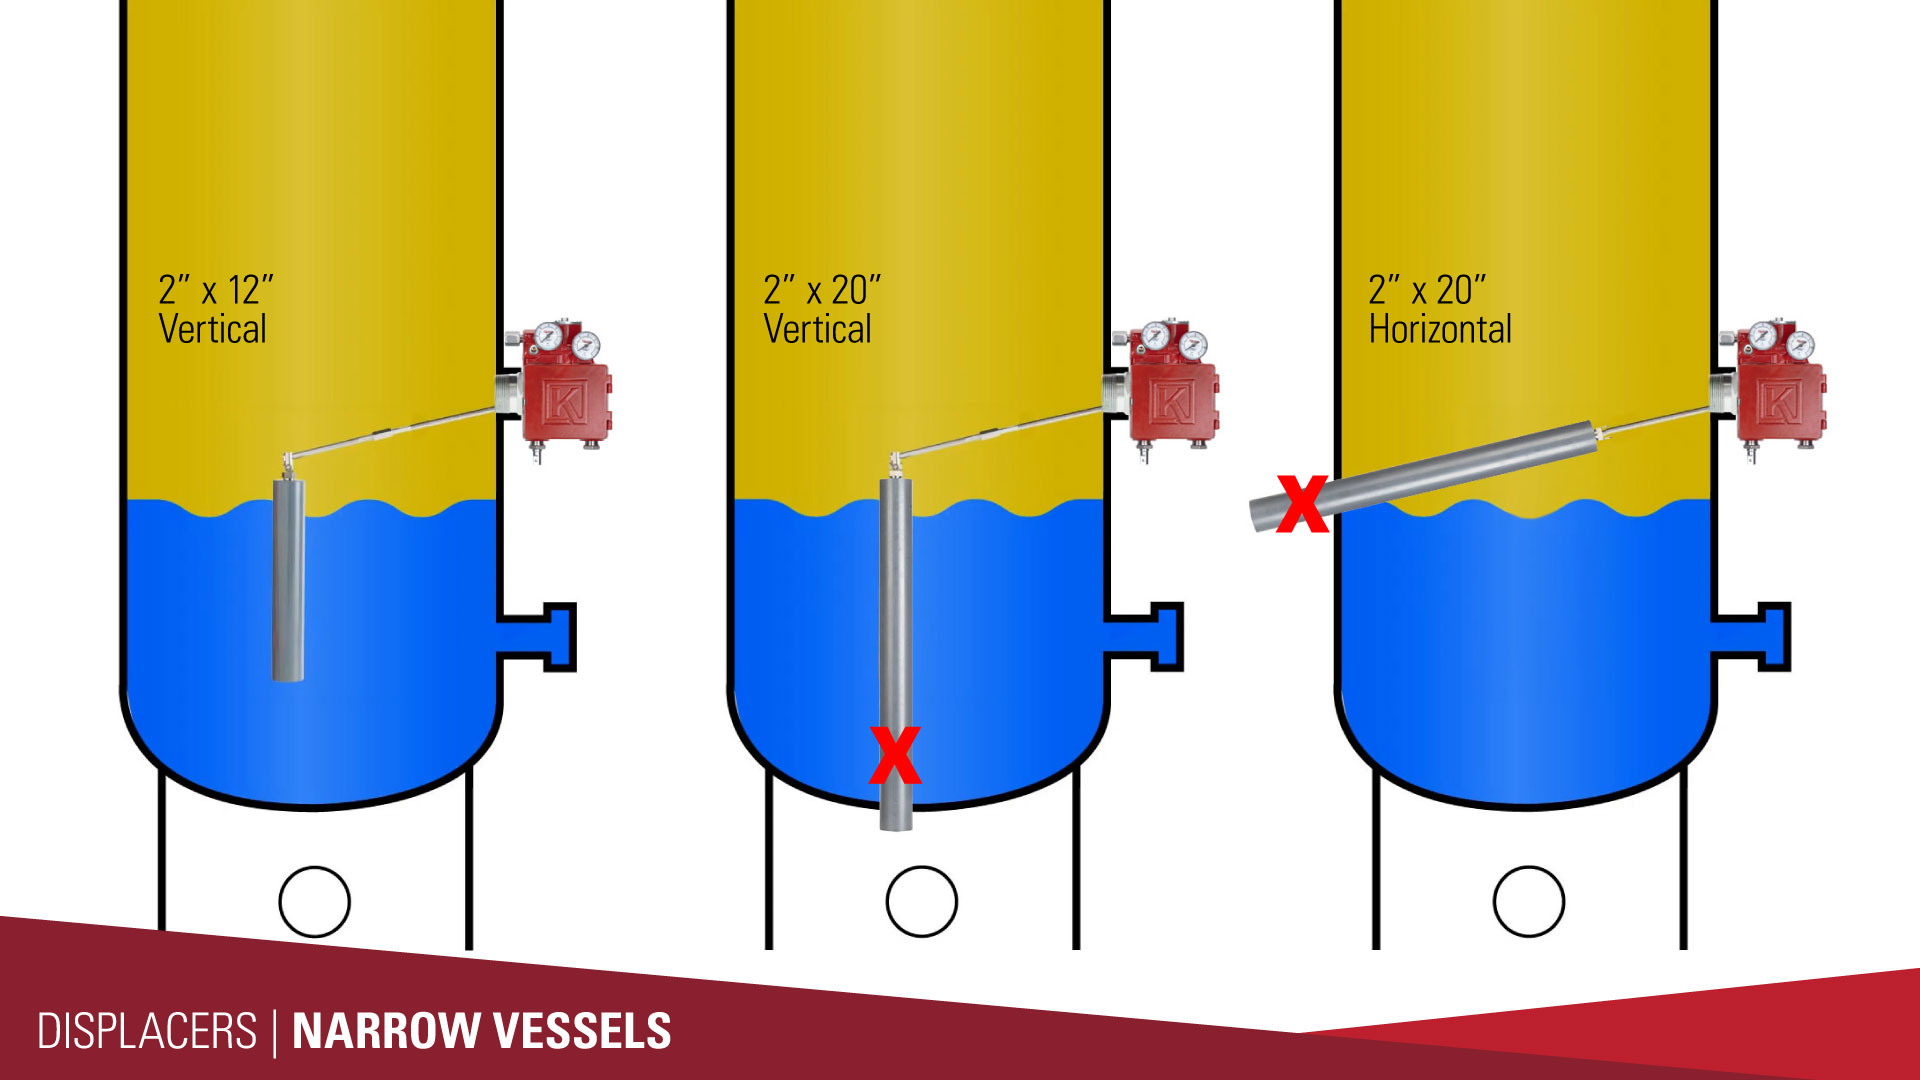
The 2"x20" displacer is for a vessel that has a narrow internal diameter. If it's in the vertical orientation, make sure it will drop down properly and not hit that back wall.
Adjustment and Setup
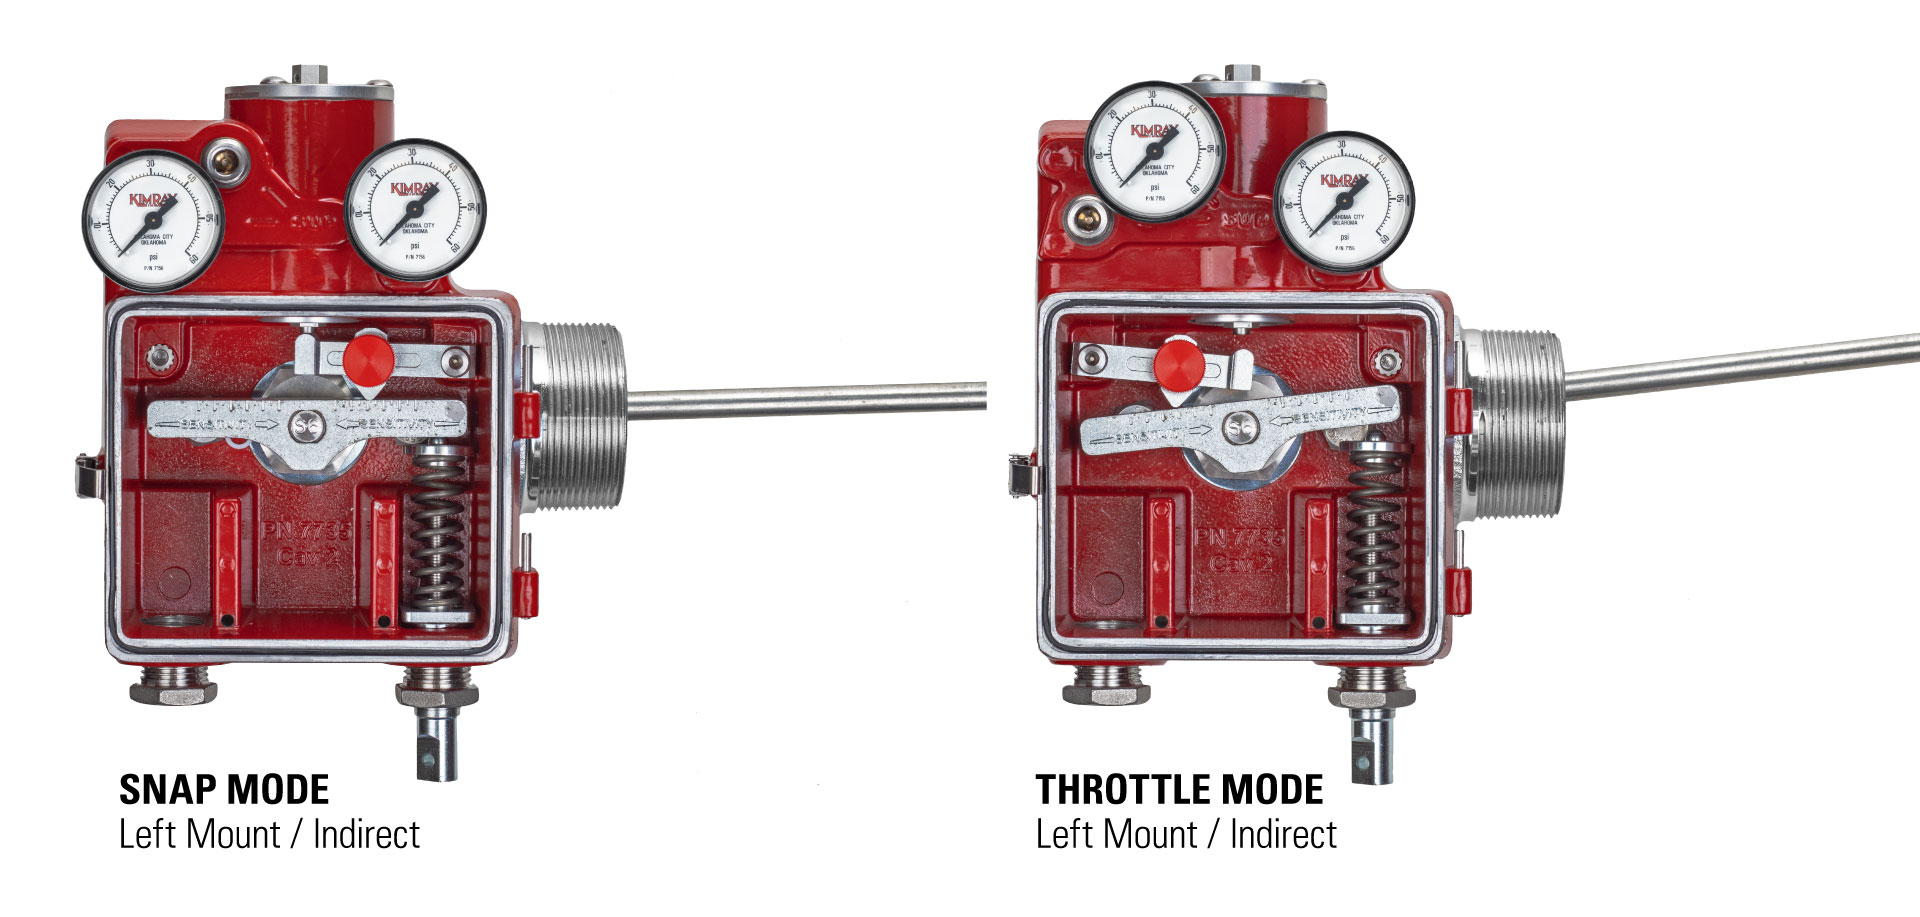
These controllers can be set up for snap or throttle action. Most dump valve applications are going to be snap acting. Especially if you have an erosive stream, you don't want to use a throttling controller because that will keep the dump valve cracked open for longer periods of time, which just leads to erosion a lot faster than if you have a snap-acting controller that opens the valve fully and then closes the valve.
Another application where you would use a snap-acting controller would be if you're metering your fluids, so you want there to be a liquid-packed line. You don't want liquids trickling through the meter, especially with turbine meters or other meters that measure the velocity of that fluid.
A lot of producers use throttling for oil and for water if it's not erosive. You can choose which one you want to operate in, and it doesn't require any extra parts on the Gen 3. All it requires is that you change the position of the supply and vent on the level controller.
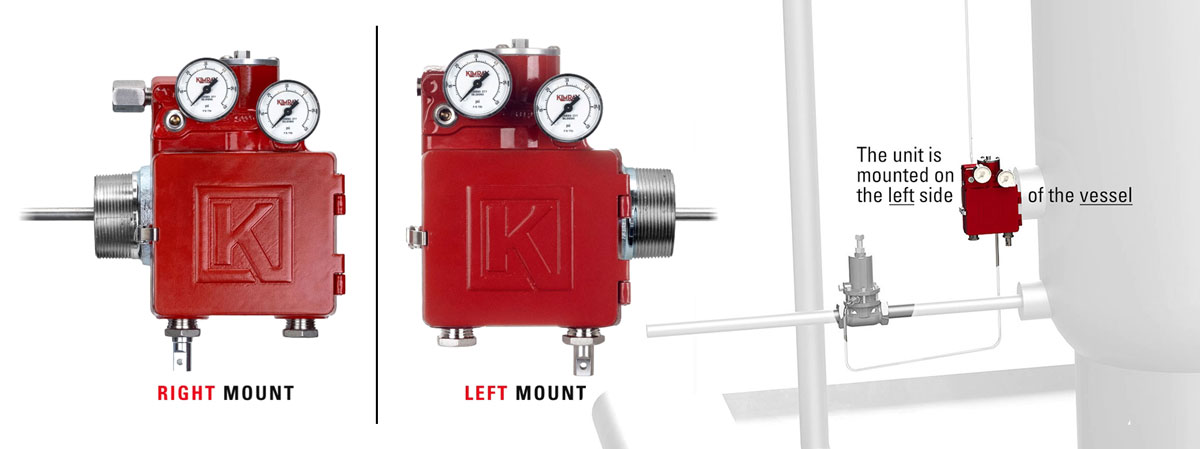
Mounting Options
With left-hand and right-hand mount options available, along with specified operating parameters, users can customize installations based on their needs and environmental conditions.
Operating Parameters
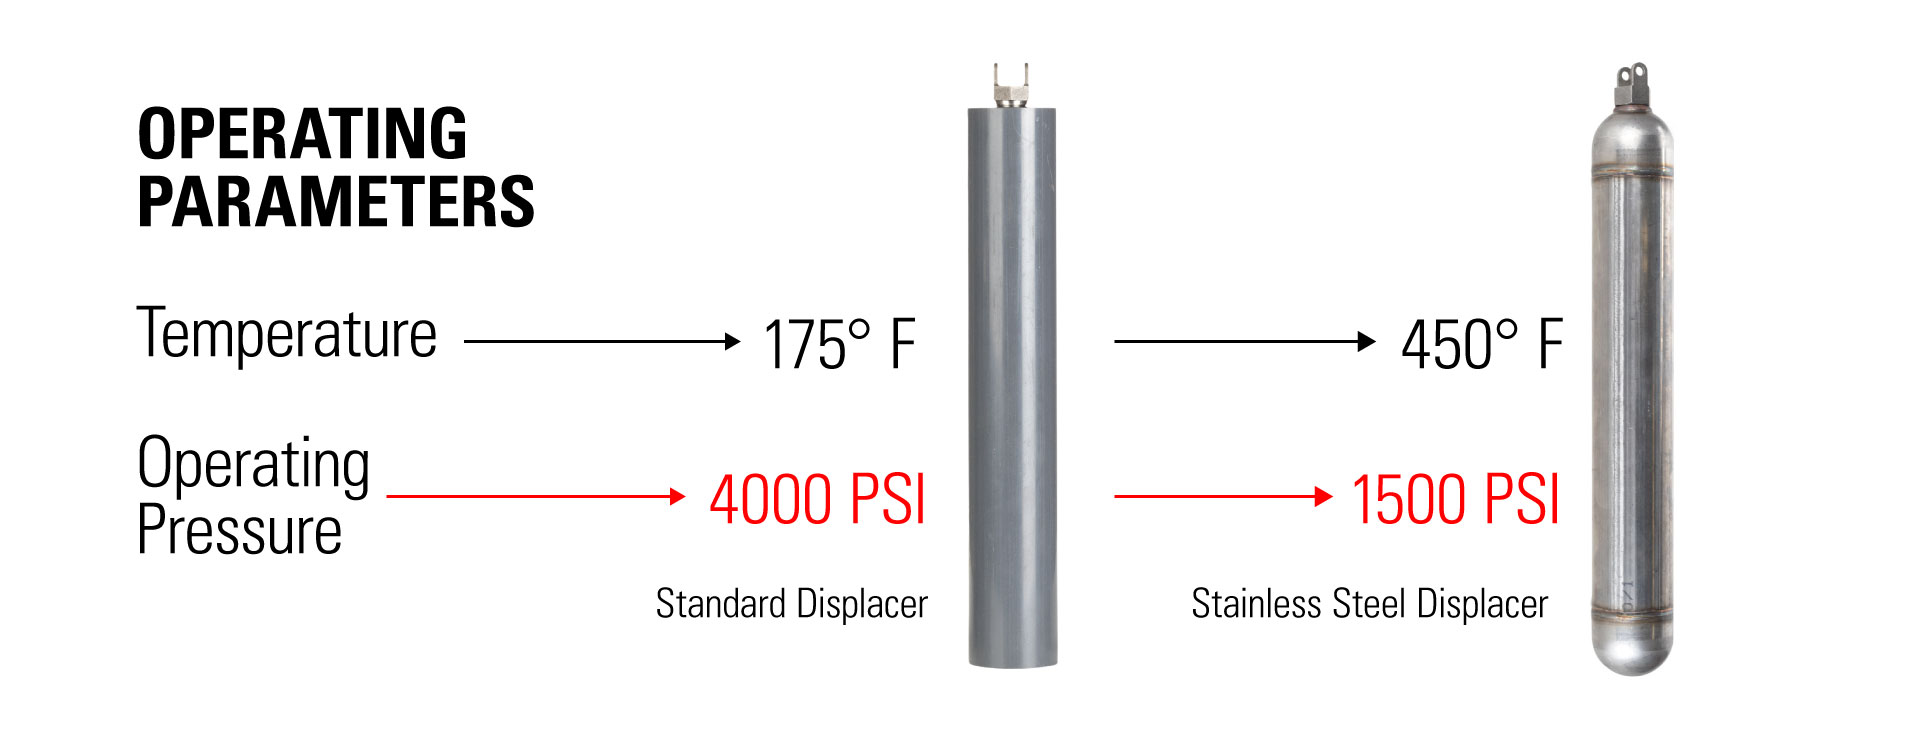
Our standard displacer has an operating temperature of 175° F. If you are putting it in an application that's going to experience higher temperatures than that, use the stainless steel displacer; however, you go from 4,000 PSI working pressure down to 1,500 PSI.
The stainless steel displacer is hollow, so it's actually more like the floats on our level switches, and that lowers the operating pressure to 1,500 lbs. Do not go over that operating pressure or it could crush the displacer.
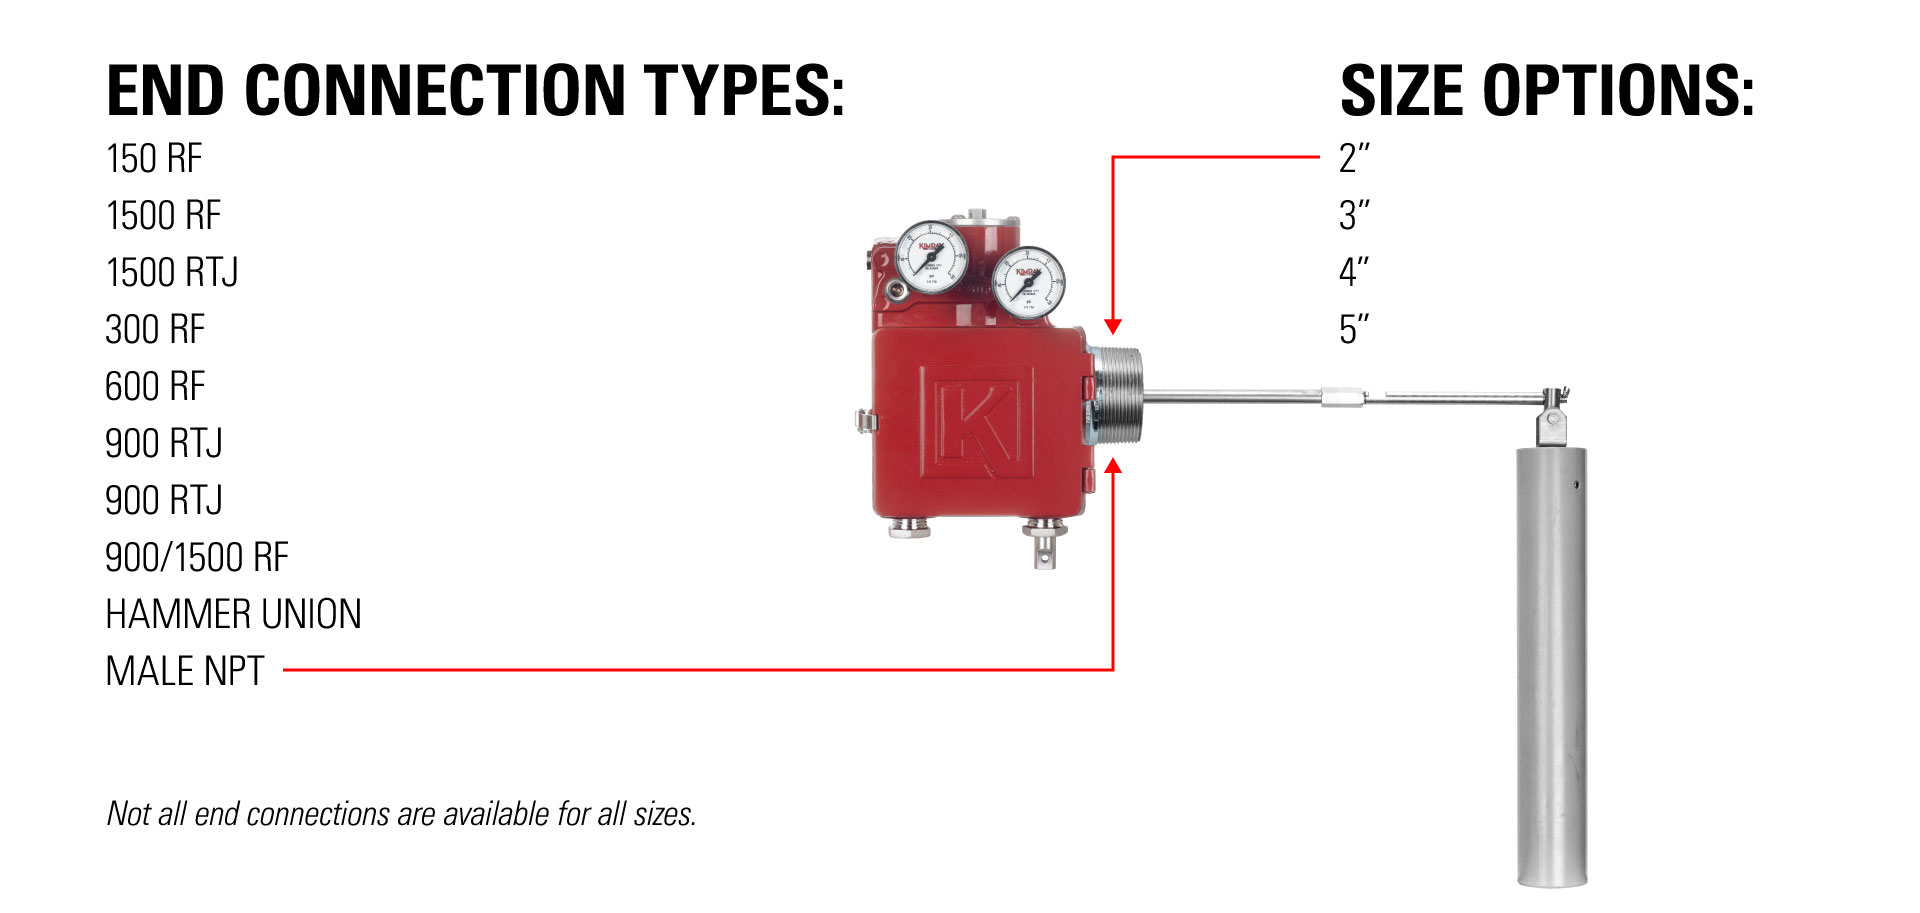
Connection Types
We have a 2” NPT connection on all of our Gen 3 models. If you are needing a flange connection, it's as easy as adding an adapter.
Maintenance and Repair
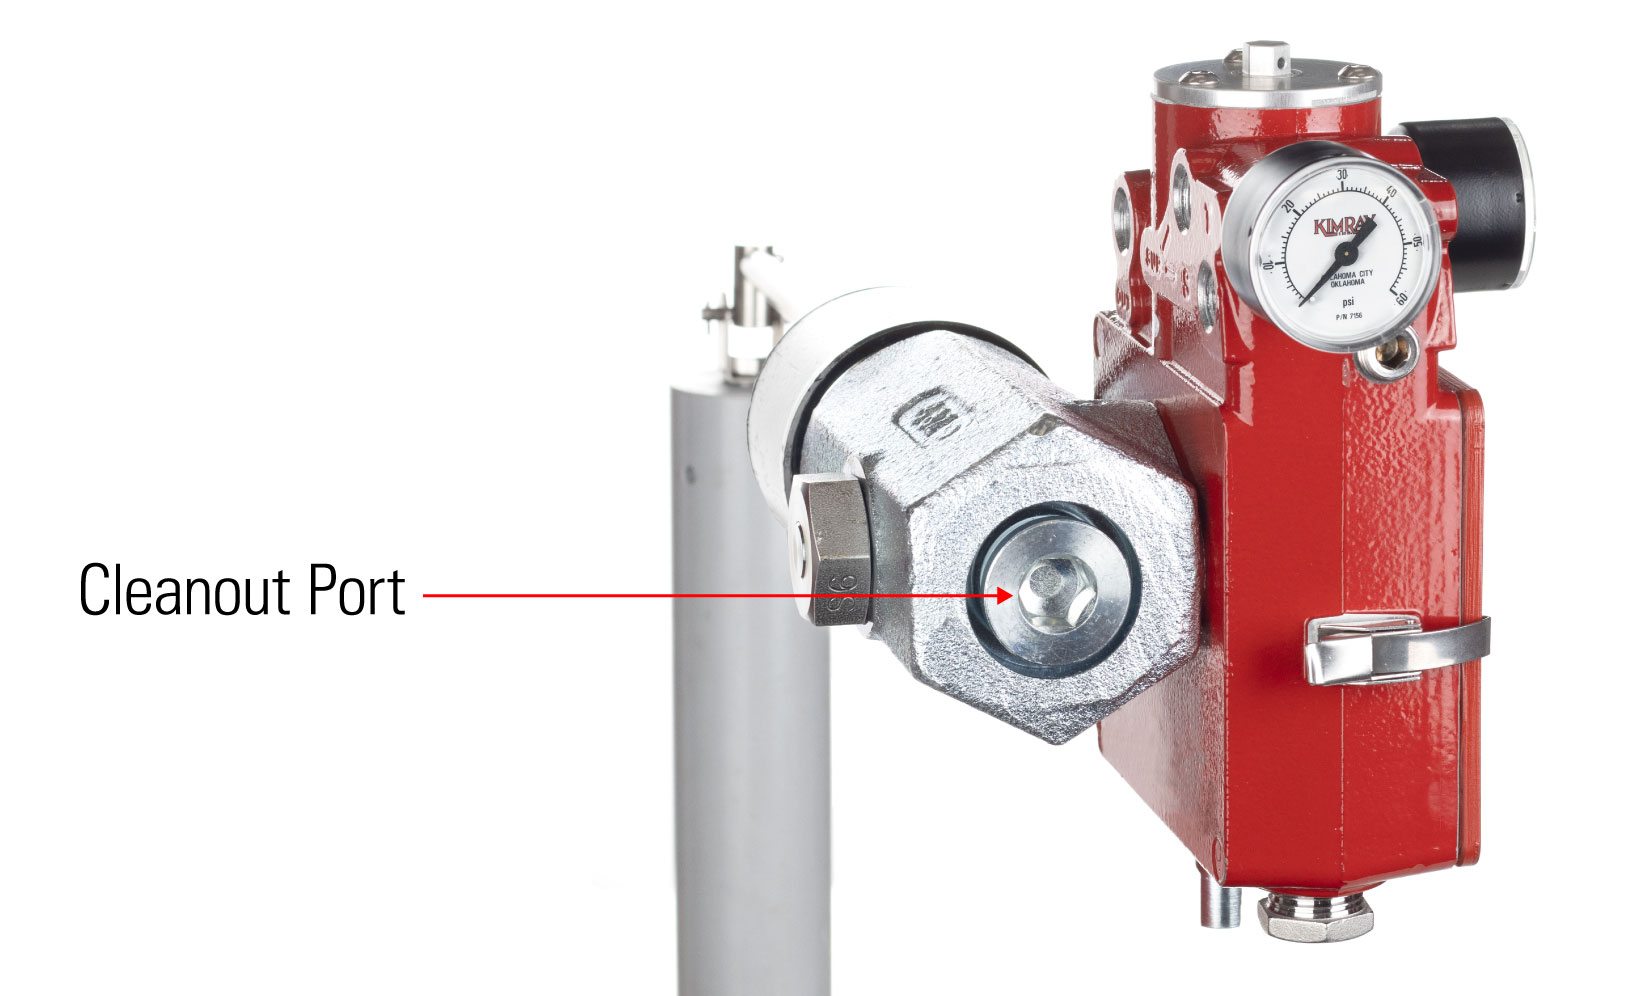
As you're operating the Gen 3, you might have buildup of either paraffin or sand or other solids inside the neck of the controller. With previous versions of our level controller you have to blow down the vessel and take the unit completely out of service to clean that out. A good feature of this one is you can access that through the paraffin clean out port.
You still have to depressurize your system, but this allows you access to the inside where the stem is, and clean out any solid buildup inside the Gen 3. Then you can pressurize your vessel again and not have to take the Gen 3 completely out of service, saving time and money.
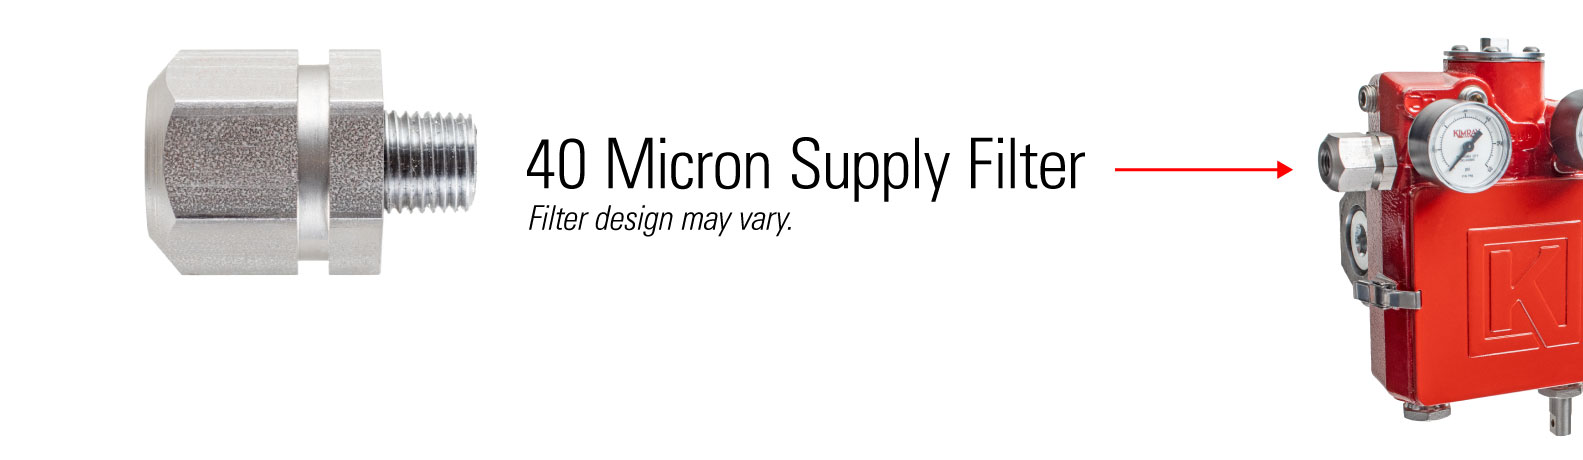
There's a 40 micron filter on the inlet side, so when you supply this with gas or air, it's scrubbing any solids out of the supply gas or air before it gets to the pilot inside of the level controller. One of the benefits of the Gen 3 is that it does not vent inside of the housing, so no gas will be building up inside.
The vent port is ¼” NPT connection, so you can capture that vented gas if you are are wanting to direct that to a vent capture system like a VRU or another low pressure gas gathering system. You can make this emissions free by capturing that gas or supplying it with compressed air instead of natural gas so that way when it vents it's just venting air and not gas.
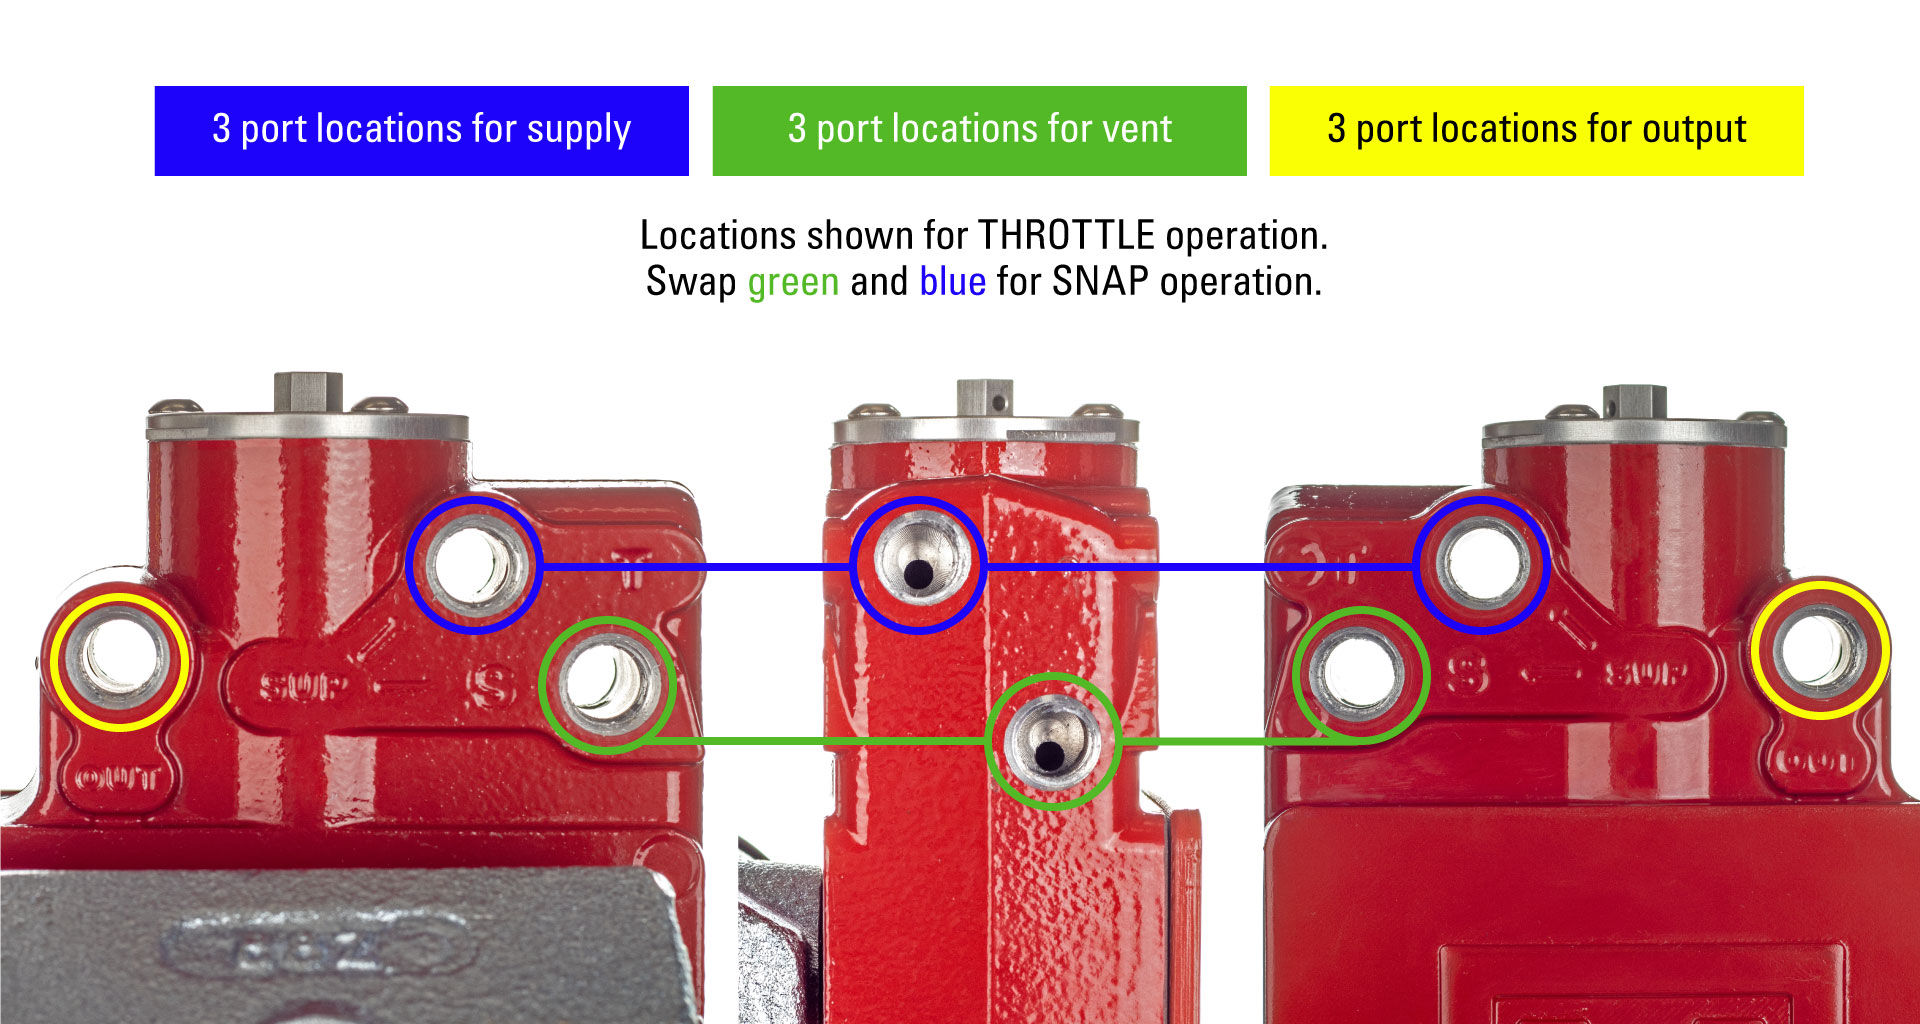
When you're determining whether you want this to be snap or throttle acting, there are options for which ports to use. "S" is for SNAP and "T" is for THROTTLE.
Vent is always going to be the opposite of your supply, so if you make this a snap controller, then it's going to vent out of one of the top ports. You can plug one port and just have it vent out one.
The output of the level controller will always remain the same. That will be going to the dump valve and will always remain the same whether you're in snap or throttle mode.
Every Gen 3 comes with an Allen wrench to help you make the adjustments, switch from snap to throttle, or change the action of the Gen 3. You can also remove the lid to make it easier to access the inside.
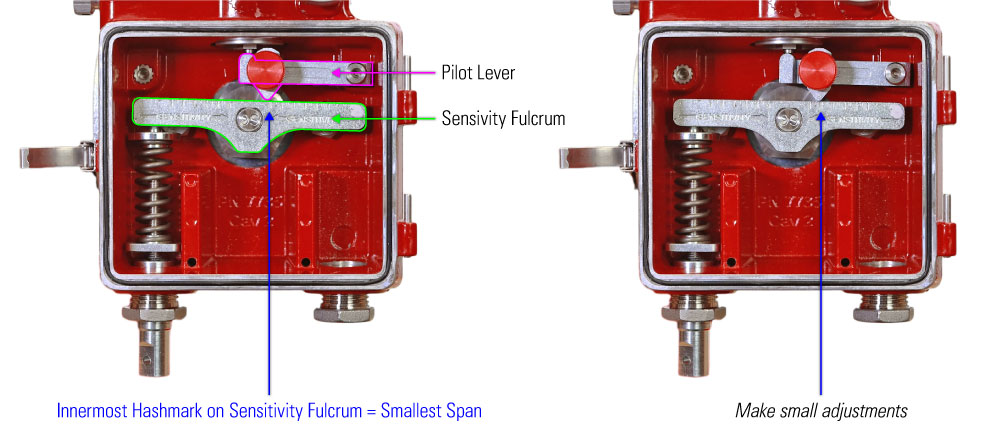
There are two adjustment points on the Gen 3—the sensitivity adjustment and the level, or you can think of it as like top level adjustment. This is going to adjust your span, or the amount of travel that the displacer has inside of the vessel, and then this one is going to adjust the top level, or where your controlling that level.
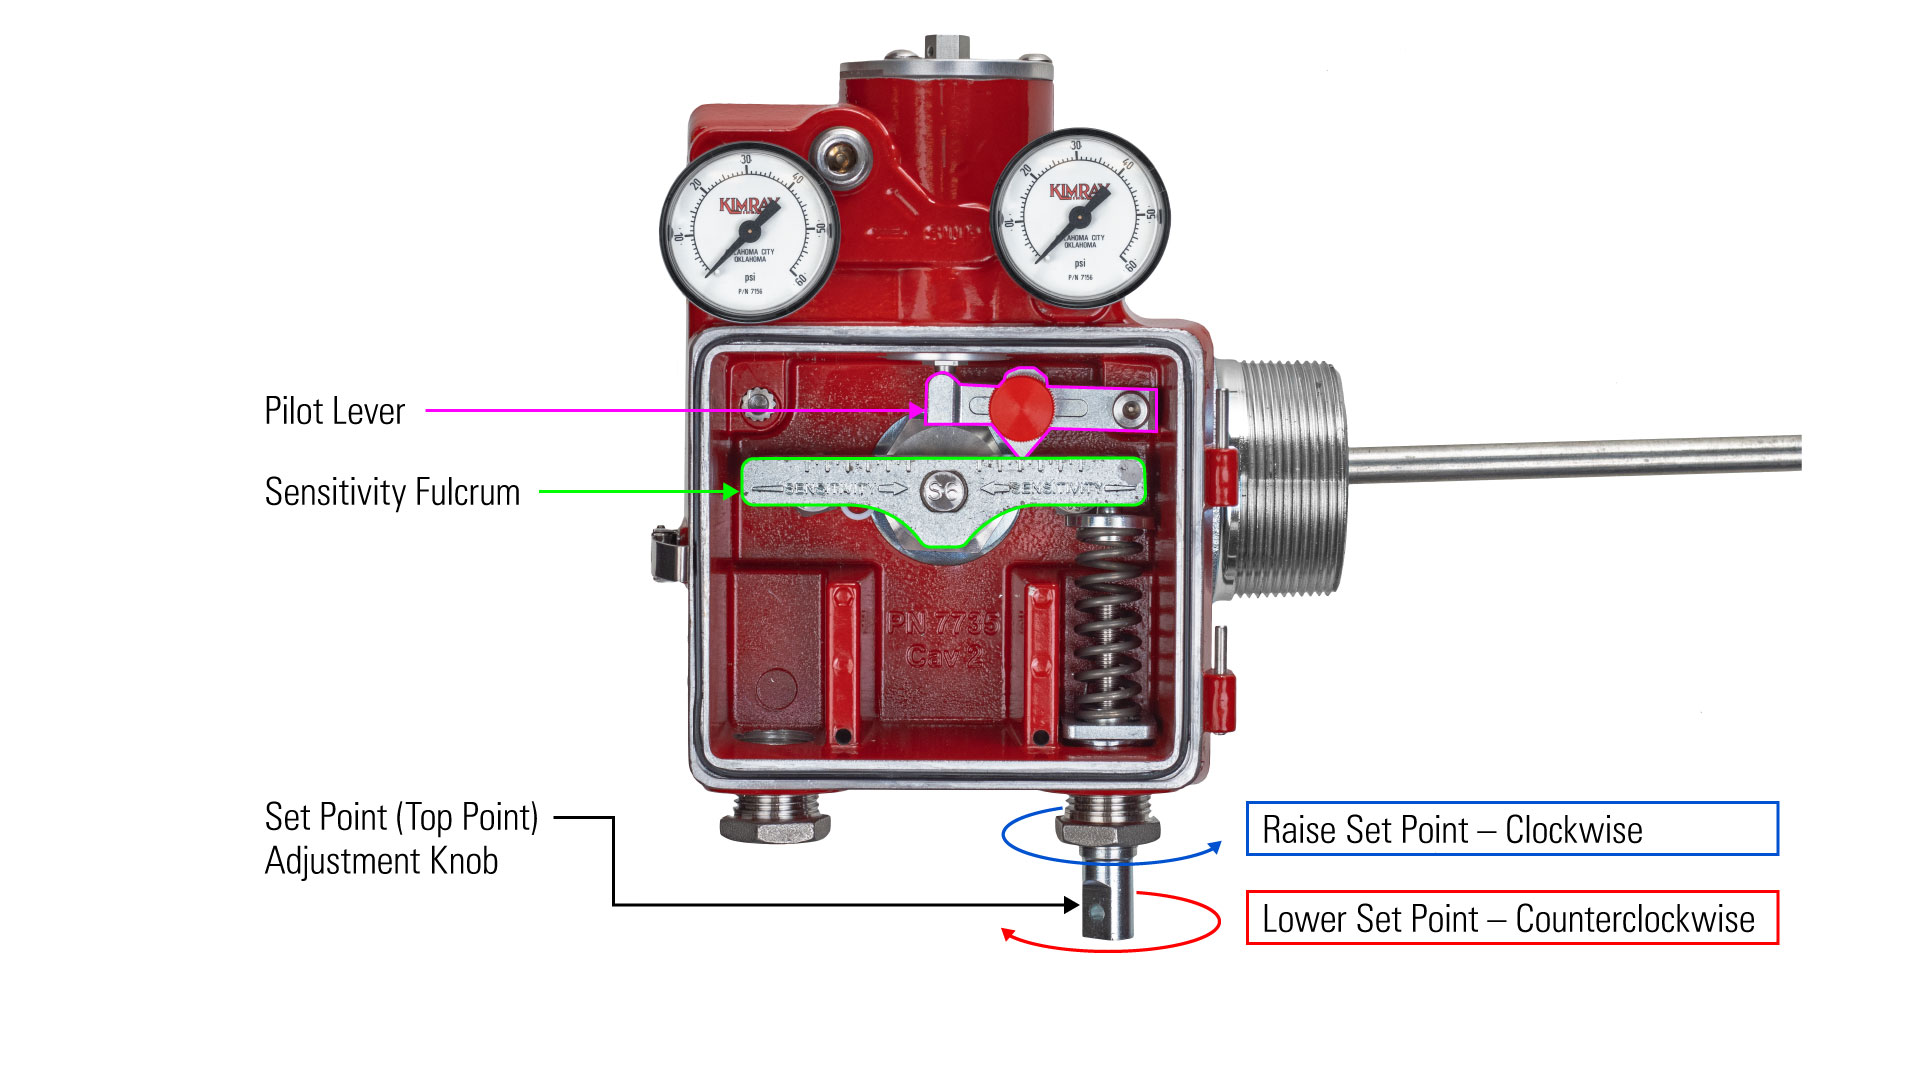
Let's say you have the sensitivity adjusted to control 8” of liquid. From the time that it opens and empties that liquid to the time it closes, you're controlling 8”. Adjustment the indicator on the pilot lever left or right will either widen or narrow that span.
No, let's say you're controlling 8” of span, but you just need that span to be lower or higher in the vessel. The Set Point Adjustment Knob is where you'll make this adjustment as you turn that clockwise and counterclockwise. (These instructions are noted in the instructions on the inside of the lid.)
Use the Allen key in the hole on the adjustment knob to give you a handy spot to make adjustments. There are also flats on this that you can put a wrench on and turn to make adjustments that way.
If you have this in throttling mode, it's suggested that you start your sensitivity on the middle hash mark. Then make fine adjustments from there. If you change too much all at once you may not know where you went wrong.
If you have this in snap mode, we suggest starting all the way in. That way you have the least amount of sensitivity. Then make small incremental adjustments to get where you want to.

We have a chart that notes where the position of the internals to the Gen 3 level controller need to be. It depends also on the failure position of your dump valve.
Pneumatic Level Switch
The Pneumatic Level Switch, is a simple, on/off switch ideal for applications requiring high- or low-level shutdown. The Gen 3 controls a span of liquid that's adjustable while the level switch is either on or off.
The total travel is just under an inch, so you would use this in applications for high or low level shut down, and you can also use this in applications where you're limited on space, for instance if you don't have a very large diameter vessel.
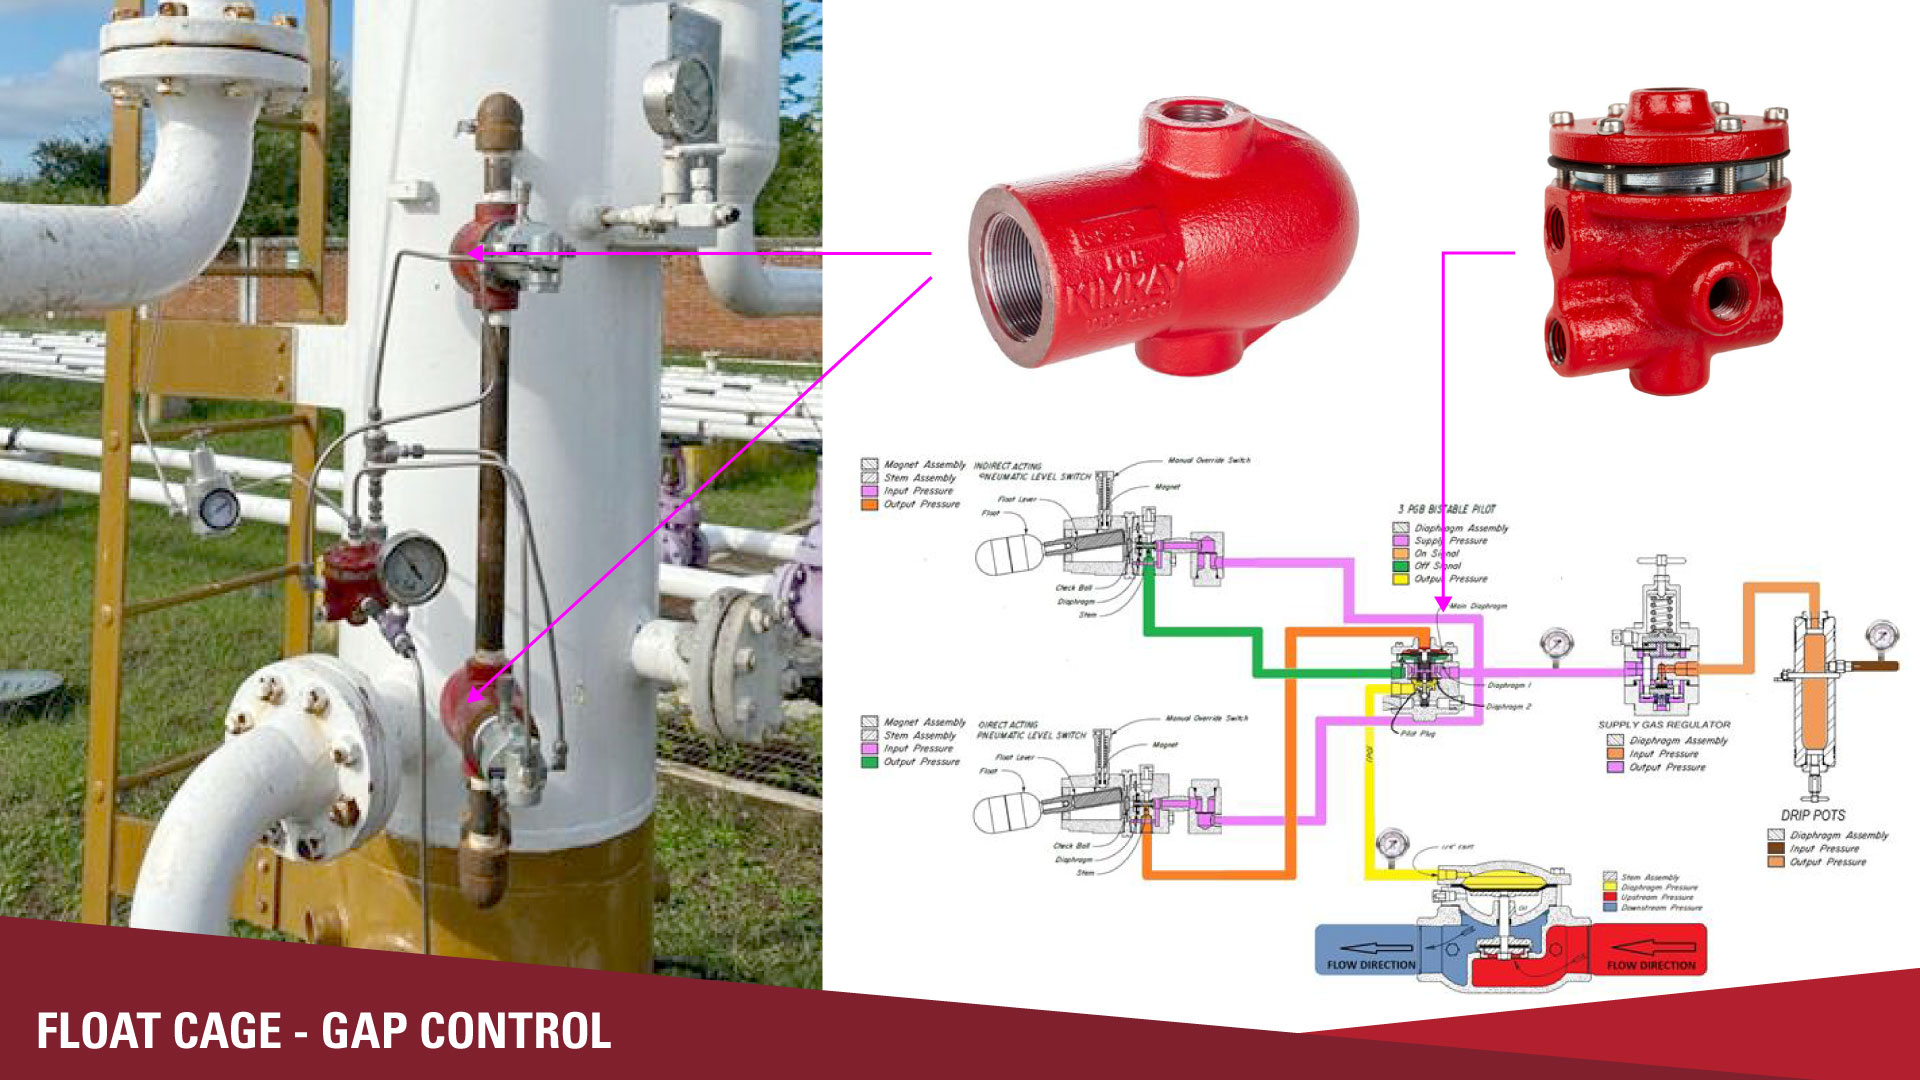
External Float Cages for Level Switches
Our external float cage can be used to position the level switch wherever you want external of the vessel. So let's say you're using a Gen 3 level controller, but you wanted it to change the position of the liquid level that's controlled inside the vessel, you could use an external float cage and position that at whatever level you want it to control outside of the vessel.
You can also use two external float cages of them to achieve a liquid gap control. In this set up there are two separate level switches working in tandem, and the liquid level oscillates between those two level switches. There's a relay that you have to use in between the two switches to get that to operate correctly, but just like the Gen 3 controller you only need 30 PSI of supply gas or air to operate the level switch.
The level switch has a 2,000 PSI working pressure. Because of the stainless steel, you can get up above 180 degrees in temperature of your fluid and not harm the the displacer or the float.
Manual Override
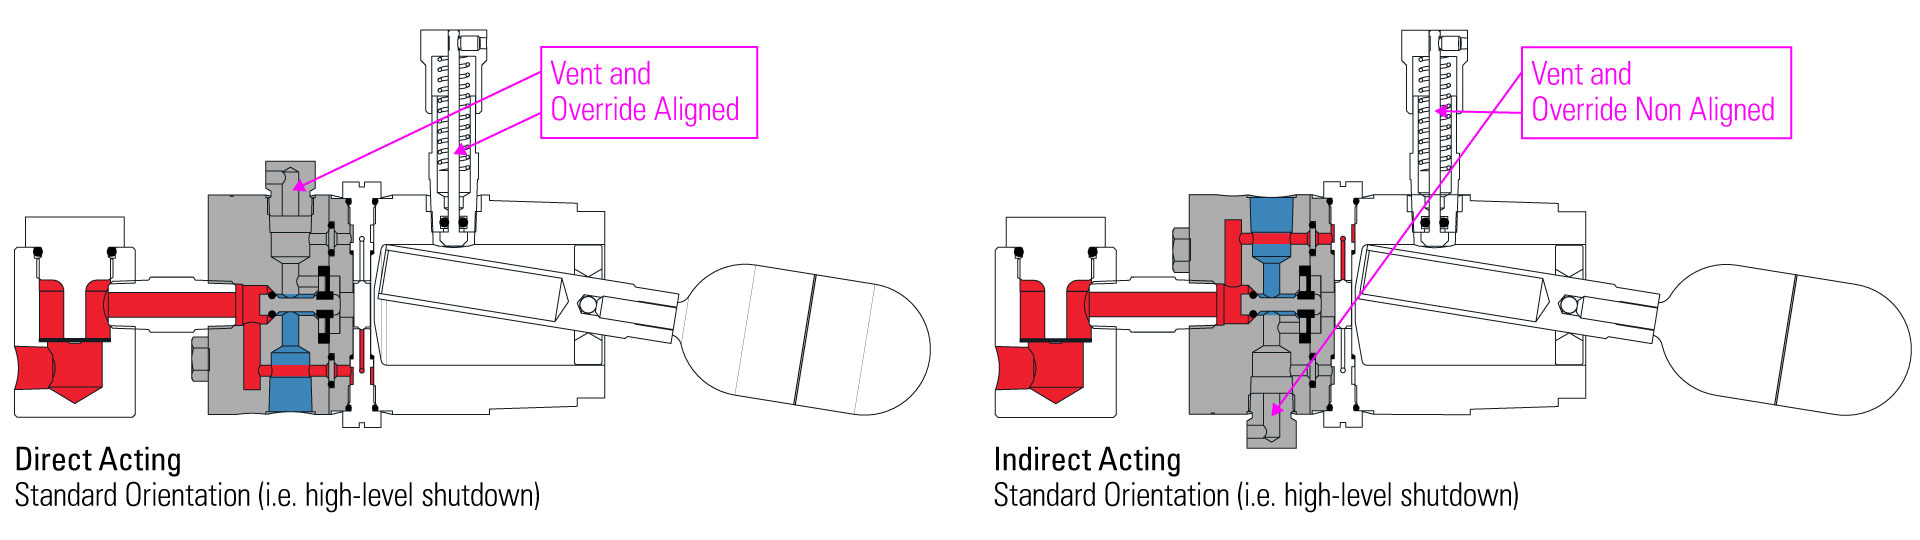
Another feature of the level switch is that it has a manual override, which can be used to test the function of the level switch without there having to be a change in liquid level inside of the vessel. You simply push down on the manual override and it manually actuates the float inside.
This allows you to check your dump valve to make sure it's operating correctly and you're getting supply gas or air through the whole system.
The vent on this is a quarter inch connection, so you can capture that vented gas into a low pressure gas gathering system.