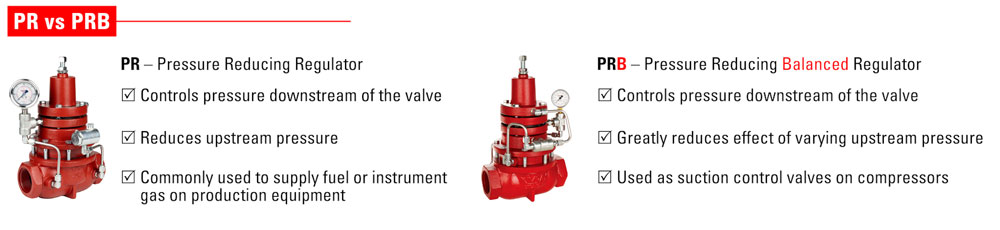
What is a Pressure Reducing Balanced Regulator?
A Pressure Reducing Balanced Regulator, or PRB, controls pressure downstream of the valve.
The balanced feature greatly reduces the effect of varying upstream pressure. These regulators are commonly used as suction control valves on compressors where a higher degree of set point accuracy is needed.
The primary difference between Kimray’s pressure reducing regulator and the balanced version is the set point drift ratio. To learn more about this concept, see our other video specifically on set point drift ratio.
What Does a Non-Vent PRB Regulator Do?
The standard version of this valve is classified as non-bleed intermittent vent and meets many producer's emissions standards. However, if your goal is to eliminate emissions or you need to install your regulator inside of a building, we recommend using the non-vent PRB.

You can achieve non-vent operation by purchasing a new non-vent version or by converting your existing PRB with a few simple parts, which I demonstrate in the video.
Helpful Documents
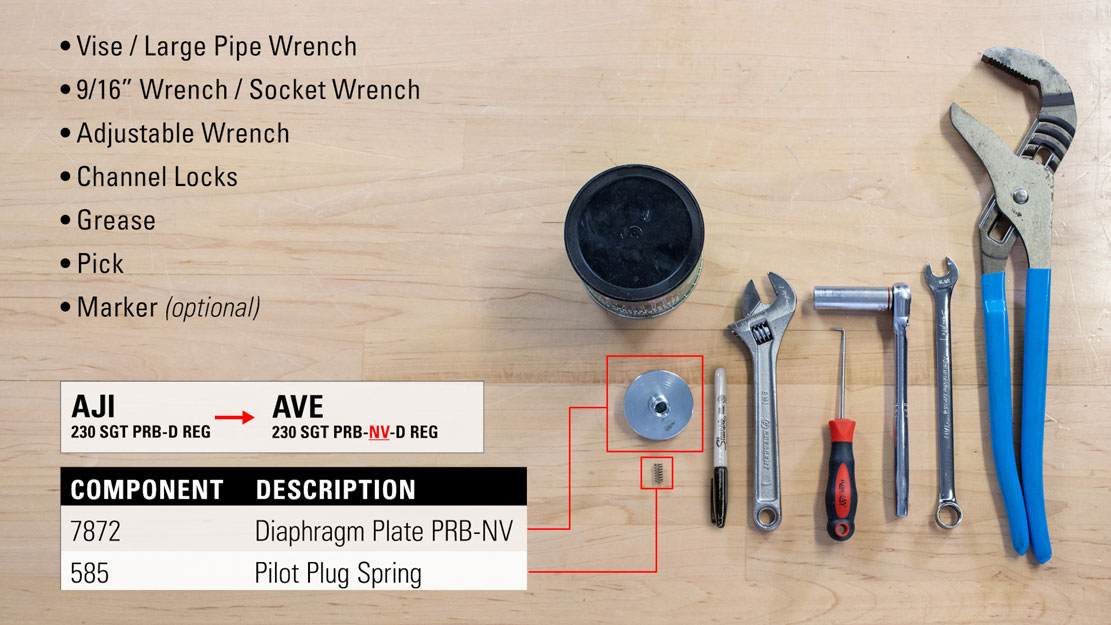
Parts Needed
- Diaphragm Plate (7872)
- Pilot Plug Spring (585)
- 9/16” Wrench / Socket
- Channel Locks
- Pick
- Grease
- Marker
How to Disassemble a Pressure Reducing Balanced Regulator for Non-Vent Conversion
We’re in a controlled environment in the video, but if you are doing this in-line, you will need to isolate and depressurize the valve first. While doing this conversion, we also recommend using a repair kit for basic maintenance and improved operation.
- First, unthread the adjustment bolt to relieve the spring pressure.
- Make a mark down the regulator to help realign the components during assembly.
- Then, loosen all the tubing connections.
- Remove the bonnet bolts with a 9/16” wrench.
- Then take off the bonnet, upper spring plate, spring, lower spring plate, and spacer.
- Inspect the gasket on the spacer for damage.
- Remove pivot screw with a 9’16” wrench.
- Remove the upper pilot housing and inspect the diaphragm for damage. If it’s damaged, it will need to be replaced.
- Remove the spacer ring.
- Remove the lower pilot housing, along with the pressure gauge and tubing. Set this aside and we will disassemble it later.
- Use a 9/16” socket to remove the bolts from the upper housing, then remove the tubing and upper housing.
- Inspect the diaphragm for damage.
- Remove the lower housing and properly discard the oil.
- Inspect the gasket for damage.
- Now inspect the removable seat for damage. If there is damage, it will need to be replaced.
- Put the diaphragm plate into the vise and use a 9/16” wrench to remove the nut.
- Remove the ratio plug and seat. Inspect them for damage and replace them if needed.
- Next, check the gasket for damage and then remove the lower housing. This gasket may have been stuck to the body instead.
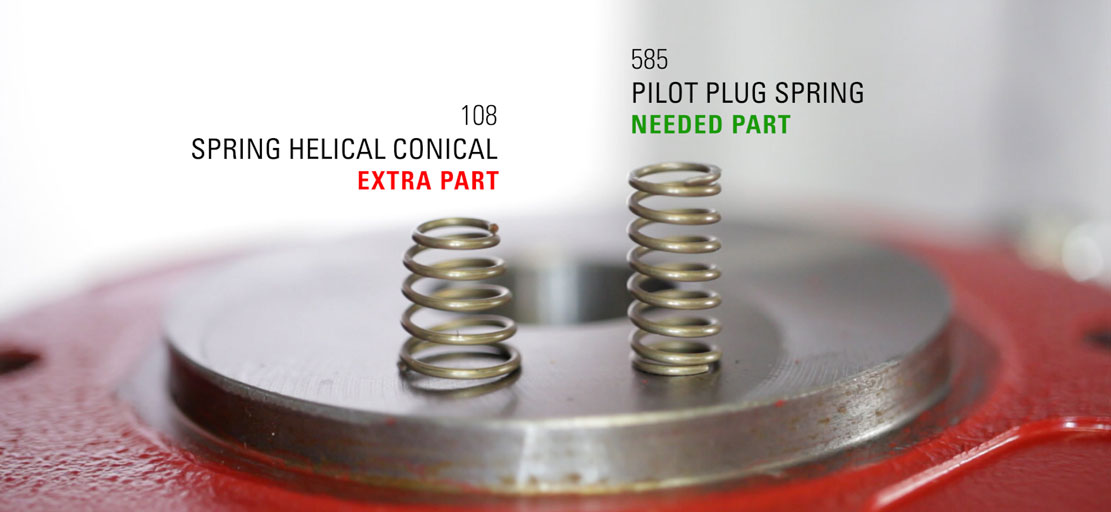
- Remove the spring and set this aside. This will be an extra part for this conversion.
- Reassemble the lower housing, seat, ratio plug and nut.
- Also apply new grease to the gasket.
- Place the pilot housing upside down in the vise on the diaphragm plate.
- Use a wrench to remove the pilot seat.
- Inspect the diaphragm and replace it if necessary.
- Use channel locks to remove the diaphragm nut from the diaphragm plate.
- Remove and inspect the diaphragm and replace it if necessary.
- Keep the diaphragm nut, but set the diaphragm plate aside, it will be an extra piece.
- Put the new diaphragm on the new diaphragm plate. If you flex it, you can make the opening larger so you can start in on the threads more easily.

- Thread the diaphragm plate into the diaphragm nut.
- Place the spacer ring around the diaphragm to know how much to tighten it. If it is too tight, the diaphragm will be distorted and not fit correctly.
- Then tighten the diaphragm nut with channel locks.
- Replace the lower pilot housing and tighten the pilot seat and diaphragm in place. Again, be careful not to over tighten.
How to Reassemble a Pressure Reducing Balanced Regulator for Non-Vent Conversion
- Put the body back in the vise and put the lower housing back on the body.
- Be sure to align your marks.
- Fill the lower housing, or oil bowl, with a low gravity oil, enough to cover the communication hole.
- Place the diaphragm on top, bevel side facing up.
- Replace the upper housing, aligning with your marks.
- Only hand-tighten the bolts at this point so that it’s easier to replace the tubing later.
Replacing the Pilot Plug Spring
- Use a 9/16” socket to remove the pilot seat.
- Inspect the gasket for damage.
- Use a pick to remove the pilot spring and set it aside; this will also be an extra piece.
- Put in the new pilot plug spring (585).
- Hold the pilot plug assembly by the ball of the pilot plug to keep it together while you thread on the assembly by hand. Then fully tighten it with a socket wrench.
- Verify that the pilot plug can move freely before continuing.
- Install the lower pilot housing assembly back on to the upper housing, making sure the diaphragm isn’t pinched or off center.
- Place the spacer ring around the diaphragm, being sure to align the bolt holes with the upper housing.
- Place the upper pilot housing, using your marks to keep it aligned.
- Thread the pivot screw threw the diaphragm, keeping the convoluted side down.
- Carefully hand start the pivot screw to ensure it is not cross threaded. Then tighten until snug.
- Add grease to the pivot screw.
- Replace the spacer and gasket, lower spring plate, spring and upper spring plate.
- Apply grease to the spring plates if necessary.
- Align the bonnet with your markings and hand-tighten the bolts.
- Reassemble all the tubing and then fully tighten all the bolts in a star pattern.
- Lastly, tighten the tubing connectors.
Now your pressure reducing balanced regulator is non-venting. If you have any questions about any part of this repair process or the custom Kimray tools used, reach out to your local Kimray store or authorized distributor.
We have other solutions available to help you meet your company’s ESG goals, including electric actuators and pilots, non-vent control valves and more. For more information, check out our emissions solutions guide.